Author Archives: Winnie N

Oatmeal Date Squares

Oatmeal Date Squares

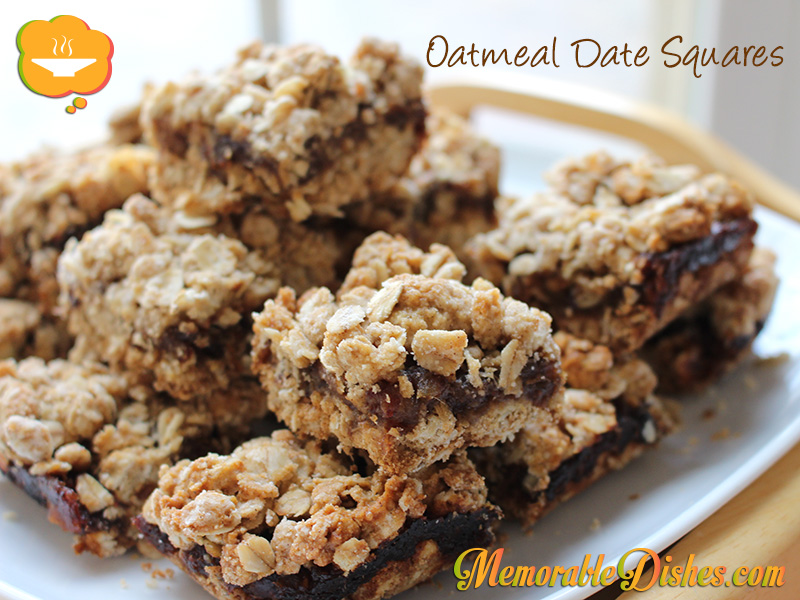
When I just had one child, I had all the time in the world—I organized play dates, matched outfits, and made homemade meals all the time. Instead of buying store-bought cookies and treats, I would bake homemade ones. I used to make oatmeal date squares and other treats for my oldest son all the time. I even experimented with making granola “balls”. That recipe was very time-consuming and involved rolling hot granola mixture into balls with my hands super speedily so that I didn’t burn myself 😛 Now that I have three children, I cannot leisurely bake as much anymore. But I still like to bake them semi-healthy treats as much as possible.

I haven’t made this Memorable Dish for awhile. While sifting through my printed recipes, I came across this one. The original recipe I found said to cook the dates with sugar but I found it unnecessary because the dates are sweet enough already. I cut down the amount of sugar from the original recipe to our family’s taste because I usually find baked goods recipes super sweet for me.

This oatmeal date squares recipe is fairly easy to make and a great nut-free snack to bring to school. Now with three children, I don’t know how long these oatmeal date squares will last! That’s why I cut them smaller to make them seem to last longer 😉Oatmeal Date Squares
Oatmeal Date Squares

Prep Time: 25 minutes

Cook Time: 35 minutes

Total Time: 1 hour

16 Squares

Ingredients

  • 1 1/2 cups pitted Dates, chopped
  • 3/4 cup Water
  • 1 1/2 cups Oats
  • 1 cup All-purpose Flour
  • 1/2 tsp baking soda
  • 1/4 tsp Cinnamon
  • 1/2 cup packed Brown Sugar
  • 1/4 tsp Salt
  • 1/3 cup Butter, melted
  • 1 Egg

Preparation

  1. Position rack in middle of oven. Preheat oven to 350°F.
  2. In a small pot, combine dates and water. Bring the liquid to a boil.
  3. Once the water comes to a boil, turn down heat and uncover pot.
  4. Cook date mixture for approximately 5 minutes or until it’s thickened.
  5. Stir and mash up dates while they’re cooking. Turn off heat once the liquid has evaporated.
  6. In large bowl, mix oats, flour, baking soda, cinnamon, brown sugar, and salt until combined.
  7. Stir in melted butter and egg until everything is blended.
  8. In a buttered 8-inch square pan, pat half of the oat mixture on the bottom.
  9. Spread the date mixture onto the oat mixture carefully.
  10. Then gently pat the remaining oat mixture over the date mixture.
  11. Bake for 20-30 minutes or until lightly brown.
  12. Cool on a rack and cut into squares.

Notes

If I remember and have time, I bake the squares for 15 minutes and then rotate the pan and bake for another 15 minutes. This helps to cook it evenly.

https://www.memorabledishes.com/oatmeal-date-squares/

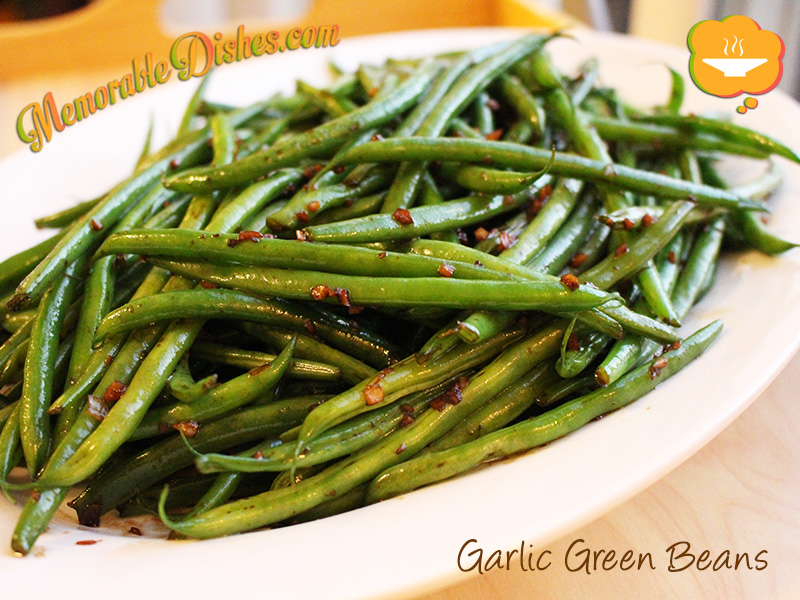
Garlic Green Beans

Garlic Green Beans

My kids insisted that I put this on my Memorable Dishes blog. They absolutely LOVE this dish. In fact, they said these garlic green beans were even better than French fries! I think they were just pulling my leg and trying to butter me up for something they want later 😉 Already, at such a young age, they’ve learned to subdue me with their sugary words…

I remember the days when the boys were not that much into vegetables. Persuading them to eat their veggies was like pulling teeth. Then when I least expected it, they were trying new vegetables! Maybe all the brainwashing horror stories I told them about not eating their veggies finally got to them 😉 I remember distinctly the first time they ate this vegetable. It was at a holiday potluck dinner with friends. We were waiting for other foods to finish cooking or heating up. The boys were super hungry so I told them to eat the garlic green beans our friends brought. I was expecting to hear moans and groans and thought to myself, they’re not going to eat them. I gave it a shot anyway and….lo and behold they ate them without any struggle! In fact, they actually embraced eating them.

I asked my friends what they put in it and all they said was garlic and butter. Since then, I started making this at home and every time they’ve loved it. Recently, I’ve added my own Asian twist to it and use soy sauce instead. Not just your regular soy sauce, mind you, but a good premium soy sauce. That took the green beans to a whole another level and that was when they said it tasted better than French fries.

I never would have thought simple garlic green beans with soy sauce could turn into a Memorable Dish. The trick is to cook the green beans to your liking. Our family likes it with a bit of a crunch to them. If you are able to find the French green beans (which are thinner), they are even better.Garlic Green Beans

Garlic Green Beans

Prep Time: 10 minutes

Cook Time: 10 minutes

Total Time: 20 minutes

Ingredients

  • 1 1/2 lb Green Beans
  • Water for boiling beans
  • Salt for boiling beans
  • 2 tbsp Vegetable Oil
  • 6 cloves Garlic, minced
  • 2 tbsp Soy Sauce

Preparation

  1. Bring water to a boil and add enough salt until you can taste it.
  2. Put green beans in boiling water. Once the water starts to boil again, drain the green beans and set aside.
  3. Heat oil in a wok or large frying pan.
  4. Add garlic and green beans and stir-fry for a few minutes until heated through.
  5. Add soy sauce and stir-fry until soy sauce is coated on all the beans.

Notes

If you end up overboiling the green beans, put them in an ice bath and drain.

https://www.memorabledishes.com/garlic-green-beans/

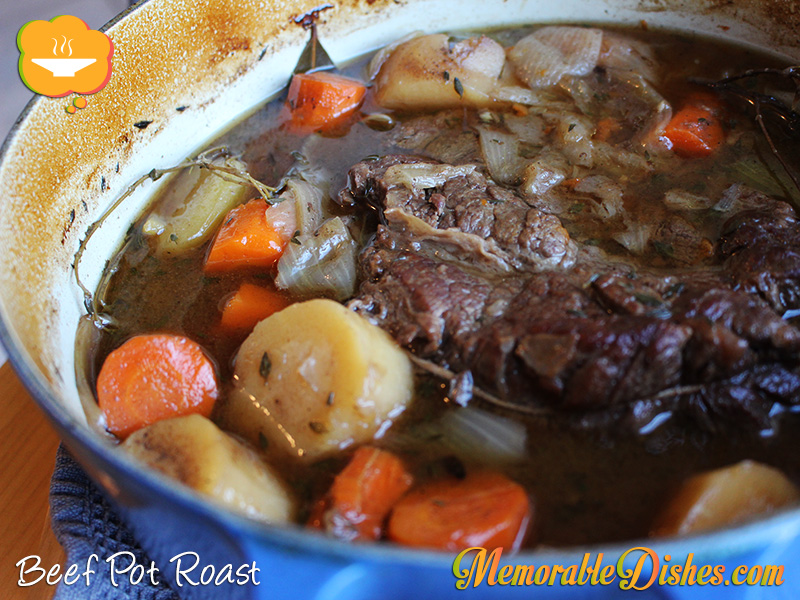
Beef Pot Roast

Beef Pot Roast

This is a comfort food for lots of people who’ve grown up in North America. It also happens to be one of my husband’s favourite Memorable Dishes made from his paternal grandmother. He’s the first to admit that she’s not as good of a cook as his maternal grandmother but nonetheless, her beef pot roast brings back sweet childhood memories. Just add a side of corn and you have a perfect meal to suit every kid’s taste. Soft tender beef and sweet kernels of corn. He remembers she always used to make corn to go with this dish.

Even though I didn’t grow up eating this Memorable Dish, I can feel how comforting eating this pot roast can be. Especially on a chilly day, I crave for hearty and saucy meals. The kids really enjoyed this dish and even my baby girl wanted more of it. I think the tender meaty goodness really ignites her palate and warms up her big belly 🙂

This pot roast might not be the same as my husband’s grandmother’s recipe, but he definitely enjoyed it. If you want the beef to be more tender, just cook it longer. This is a great leftover dish and tastes even better the next day!Beef Pot Roast

Beef Pot Roast

Prep Time: 20 minutes

Cook Time: 3 hours

Total Time: 3 hours, 20 minutes

Serving Size: 6

Ingredients

  • 1 Beef Pot Roast (approximately 3 pounds)
  • 2 Onions cut into quarters
  • 4 cloves Garlic, whole
  • 2 Carrots cut into 2-inch pieces
  • 2 Parsnips cut into 2-inch pieces
  • 2 Celery stalks cut into 2-inch pieces
  • 2 large Potatoes cut into large chunks
  • 2-3 sprigs Thyme
  • 1 Bay Leaf
  • 2 tbsp vegetable oil
  • Salt & Pepper
  • 4 cups Beef Broth

Preparation

  1. Preheat the oven to 325 degrees F.
  2. Pat roast dry and sprinkle it generously with salt and pepper.
  3. Heat oil in Dutch oven and brown all sides of the roast. Set aside.
  4. In the same pot, add onions and garlic.
  5. Deglaze the pot with beef broth and scrape the bottom of the pot.
  6. Put roast back into the pot and add the rest of the vegetables, thyme and bay leaf.
  7. Bring liquid back to a boil.
  8. Taste the broth and add more salt if needed. (Remember the meat and vegetables are going to absorb the salt and if it’s not salted enough, it’s going to taste bland once it’s cooked.)
  9. Cover Dutch oven and bake in the oven for 2 1/2 to 3 hours until beef is tender.
  10. Serve with crusty bread and if you’re Asian, serve with rice 🙂
https://www.memorabledishes.com/beef-pot-roast/


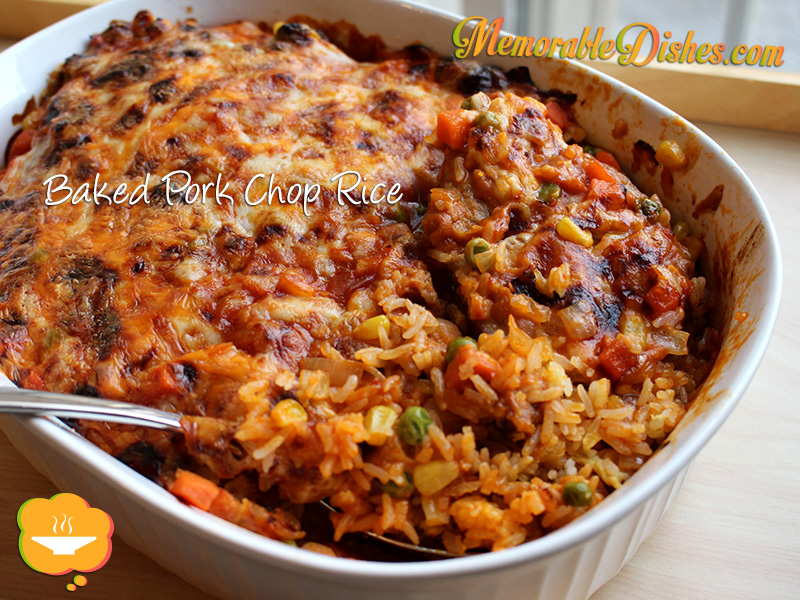
Baked Pork Chop Rice – Hong Kong Style (焗豬扒飯)

Baked Pork Chop Rice

Baked Pork Chop Rice is a much enjoyed and popular dish at Hong Kong-Western style cafés. Until recently, I didn’t know what sauce the cafés used for their baked pork chop rice. Somehow I never questioned where the smooth and pasty tomato sauce that adheres to the top of the pork chops came from. It could be béchamel sauce with tomato paste mixed in? The tomato sauce definitely doesn’t taste like the familiar tomato sauce that goes on top of Italian meatballs. I thought about it for a bit but never gave it much more thought.

Somehow when I was perusing down the canned soup aisle…eureka—canned tomato soup! Yes, food thoughts pop into my head when I least expect it. How could I not have figured this out? Based on the taste, texture and colour, they must use canned tomato soup as their sauce! Don’t quote me on it, the cafés might very well make their sauce from scratch and use their special secret ingredients. But I figure to make this Memorable Dish at home, it’s a great and easy alternative to use canned tomato soup.

This comfort food is enjoyed by many Hong Kongers. Eating out in Hong Kong is the norm because everyone is super busy and food is readily available everywhere. Some cafés deep-fry their pork chops but this homemade version is pan-fried. At the restaurants, they usually use egg fried rice as the base. If it’s too much hassle, just use plain steamed rice. Our kids really enjoyed this Memorable Dish at our home Hong Kong-Western style café! I just have to make a Yinyeung (Hong Kong style coffee and tea) to go with it next time 😉

Baked Pork Chop Rice

Baked Pork Chop Rice – Hong Kong Style (焗豬扒飯)

Prep Time: 20 minutes

Cook Time: 30 minutes

Total Time: 50 minutes

Serving Size: 4

Ingredients

  • 4 pieces of Pork Loin
  • 1 tbsp Soy Sauce
  • 1 tsp Sugar
  • 1 tsp Cornstarch
  • 1 tsp Chinese Cooking Wine (optional)
  • 1/8 tsp White Pepper
  • 1/4 cup Flour
  • Vegetable Oil (enough to cover your pan 1/4 inch deep)
  • 2 cloves minced Garlic
  • 1 small Onion, diced
  • 1 can of Tomato soup
  • 1-2 cups of frozen Peas, Carrots, Corn (thawed)
  • 5 cups cooked Egg Fried Rice or Plain Rice
  • 1/2 cup Mozzarella Cheese, grated
  • 1/2 cup Cheddar Cheese, grated

Preparation

  1. Use a meat tenderizer or the back of a cleaver to tenderize the pork chops.
  2. Marinate pork chops with soy sauce, sugar, cornstarch, cooking wine and white pepper for at least 30 minutes.
  3. Preheat oven to 400°F before frying pork chops.
  4. Lightly flour both sides of the pork chops.
  5. Heat oil and fry pork chops on each side until brown. Set aside.
  6. Drain all the oil except for 1 tablespoon left in the pan.
  7. Sauté onions for a few minutes then add the garlic.
  8. Pour the can of tomato soup into the onions and use a bit of water to rinse out the rest of the soup in the can.
  9. Mix the vegetables into the sauce and turn off heat.
  10. In a glass or ceramic dish, put rice at the bottom, then the pork chops and then top with the tomato sauce.
  11. Sprinkle with cheese and bake for 20 to 30 minutes depending on how thick your pork chops are.
  12. If your cheese is not brown enough, you can put it under the broiler for a few minutes.

Notes

Make sure the oil is hot before frying pork chops. To test if the oil is hot enough, sprinkle a little flour in it. If it sizzles, then it’s hot enough.

https://www.memorabledishes.com/baked-pork-chop-rice/

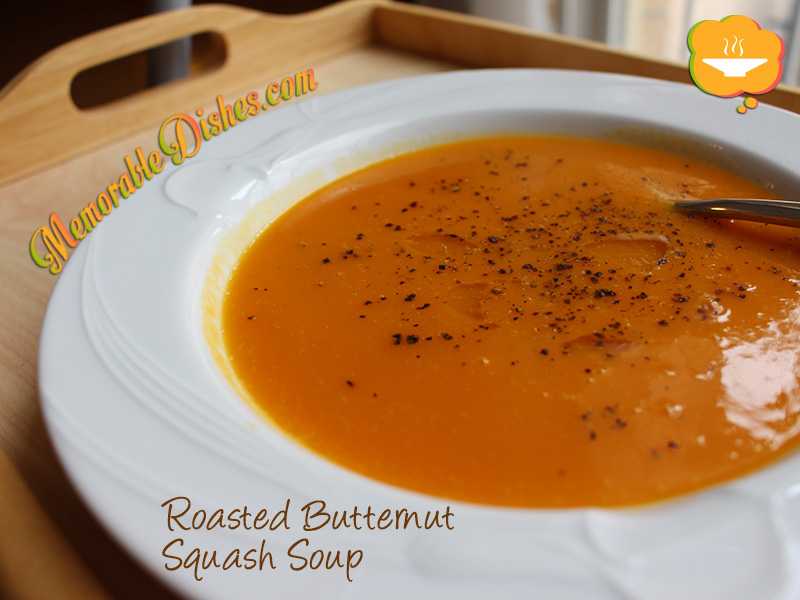
Roasted Butternut Squash Soup

Roasted Butternut Squash Soup

I am beginning to enjoy this time of year. I used to dread the Fall season because the weather gets cooler and summer clothes and flip flops get put away. Now when the leaves turn orange, brown and red, I think of eating warm and nourishing foods. I love that the colours of the vegetables in season also resemble the colours of the leaves.

Butternut squashes and other types of squashes dominate the grocery store this time of year. It’s hard not to buy them and make something out of them. The kids really enjoy this Memorable Dish, but this wasn’t always the case. They were used to drinking Chinese cleansing soup which is clear, so drinking this thick soup was weird to them. Now that they’re older and their taste has evolved, they are embracing this mushy soup. I make different versions of this soup and my oldest son really likes it with cumin added in.

I have tried roasting the butternut squash with the peel on, but the results are better if you peel it first. If you leave the peel on, the flavour gets left behind on the peel. Since you scoop the flesh out after roasting, the caramelization is left on the peel where the flavour is. To give this soup extra oomph, I tossed in a few garlic cloves to roast with the squash.

This is one of the recipes that you can’t really screw up and can make on the fly with a few ingredients on hand. If you want to sauté some onions and carrots, feel free to do so. I make this soup different every time and everyone always loves it! Enjoy this super easy (except for the peeling of the butternut squash part :P) and delicious Memorable Dish while the squashes are in season.

Roasted Butternut Squash Soup

Roasted Butternut Squash Soup

Prep Time: 20 minutes

Cook Time: 40 minutes

Total Time: 1 hour

Serving Size: 4

Ingredients

  • 1 Butternut Squash, peeled and cut into 1/2 inch chunks
  • 5 cloves of Garlic, peeled
  • Olive Oil
  • 4 cups Chicken or Vegetable Stock
  • 1/2 tsp Cumin
  • Salt & Pepper to taste

Preparation

  1. Preheat oven to 400°F.
  2. Place butternut squash and garlic on roasting pan and put enough olive oil to coat everything. Toss and make sure all the pieces are coated.
  3. Roast butternut squash and garlic for 20-30 minutes.
  4. Flip them around with a spatula and roast for another 20-30 minutes or until brown.
  5. In a pot, put the roasted butternut squash, garlic, cumin and stock.
  6. Use an immersion blender to blend until smooth.
  7. Bring the puréed soup to a boil.
  8. Add salt and pepper to taste. Then drizzle olive oil on top if desired.

Notes

Use more or less broth depending on the consistency you like or the size of your butternut squash.

https://www.memorabledishes.com/roasted-butternut-squash-soup/

Thanksgiving Dinner 2015

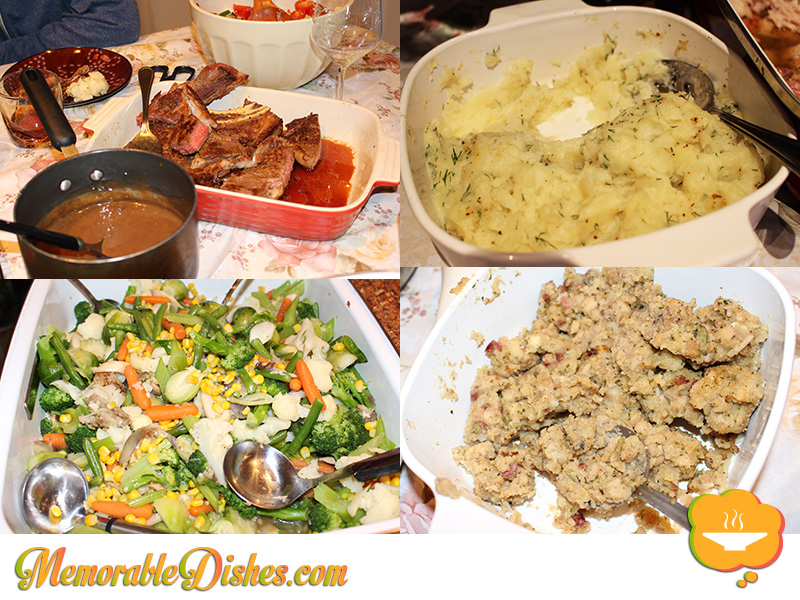
Our family Thanksgiving dinner is always a big production. My mom thinks there’s never enough food and ends up making many different things. She is used to cooking Chinese style where we have many dishes. So making Thanksgiving dinner is not a far stretch from her usual Chinese dinner.

The dinner usually consists of a whole turkey, prime rib (this year, we had steak instead), mashed potatoes, stuffing, steamed vegetables, garlic bread, and being a Chinese family, we also have rice of course. But not just our regular steamed rice – steamed rice made with canned mushroom soup. I don’t remember how or when we started making this kind of rice. But we’ve been having it every time we have turkey.

Thanksgiving Dinner 2015

Steak & Gravy, Mashed Potatoes, Stuffing, Steamed Vegetables (From top left, clockwise)

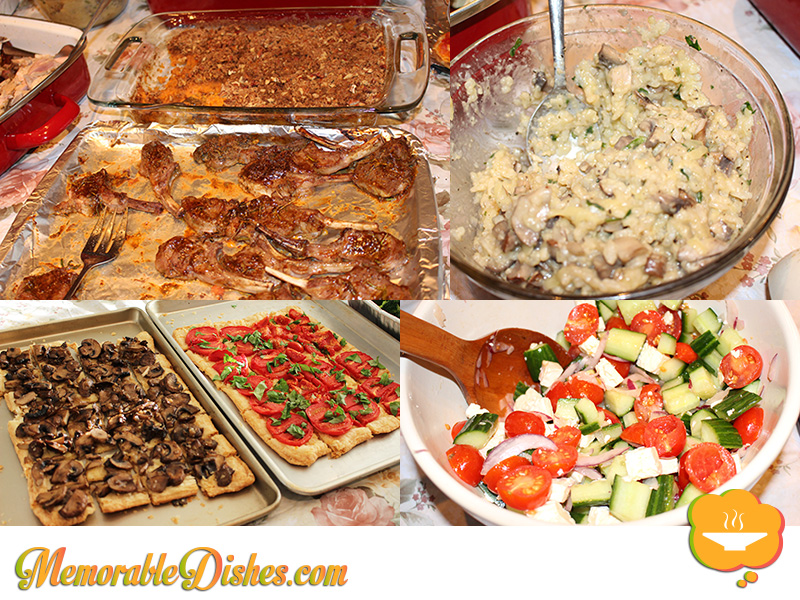
My cousins also contribute to the already abundant array of dishes for Thanksgiving. This year, in addition to our usual fare, we had sweet potato casserole, mushroom risotto, tomato and cucumber salad, and lamb chops. Don’t forget about appetizers and desserts! My grandmother is a vegetarian, so I usually make a couple of vegetarian appetizers. To make it easier for myself, I made something with puff pastry. I made one with garden tomatoes and the other one with sliced mushrooms. Both have Gruyère cheese on them.

Thanksgiving Dinner 2015

Sweet Potato Casserole, Lamb Chops, Mushroom Risotto, Tomato & Cucumber Salad, Mushroom and Tomatoes on Puff Pastry (From top left, clockwise)

Since my mother makes so many different types of food, something always gets shafted. In our household, it’s the garlic bread. Someone is supposed to keep an eye on it but somehow we always end up burning it. There are multiple things being made and everyone pitches in one way or another. So the garlic bread always gets missed. I started using the oven timer so that we don’t forget about it. This year we didn’t burn the garlic bread because I was in charge of it. But I forgot to take pictures of it! Too many people and too much action going on!

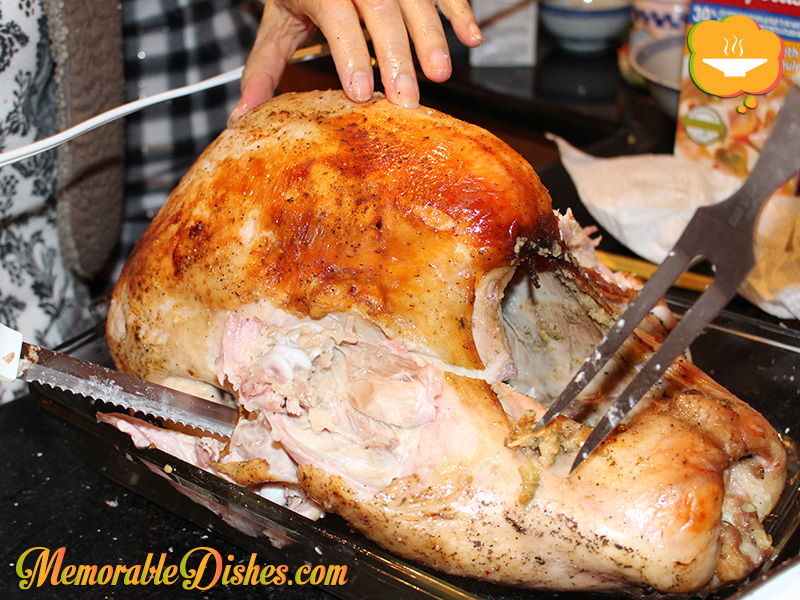
I was overzealous with the food that I forgot to take a picture of the whole uncut turkey! I also forgot to take photos of the desserts! I’m a horrible food blogger! Hahaha…I was enjoying the moment so I didn’t take as many photos as I should have. Plus, my crazy baby girl was calling for food constantly that I was tending to her on top of helping my mom prepare. For dessert, I made my Mini Fruit Cheesecake and others brought pumpkin cupcakes, apple tart, tiramisu cake, Japanese tofu cheesecake, jello, and of course fruit to balance everything out.

Thanksgiving Turkey

Overzealous with eating and forgot to take photo of whole uncut turkey and desserts!

This is a wonderful time of year to reflect and be thankful to have loved ones to share our Memorable Meals with. I know our kids are especially excited not only about eating the food but also having everyone over to share it with. I’m sure every family has their special Memorable Dishes that they make on these occasions. I hope you enjoyed eating and spending time with your loved ones on this special Thanksgiving weekend!

Ramen Noodles

Ramen Noodles

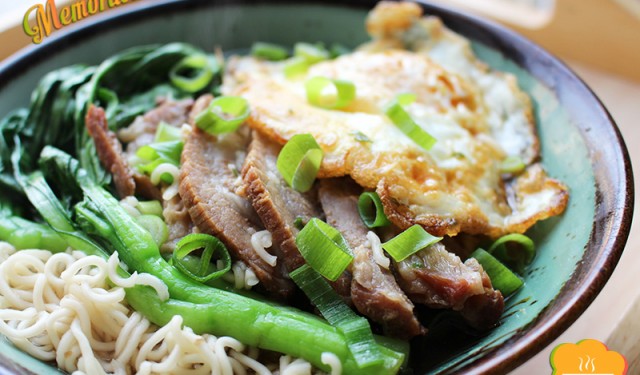
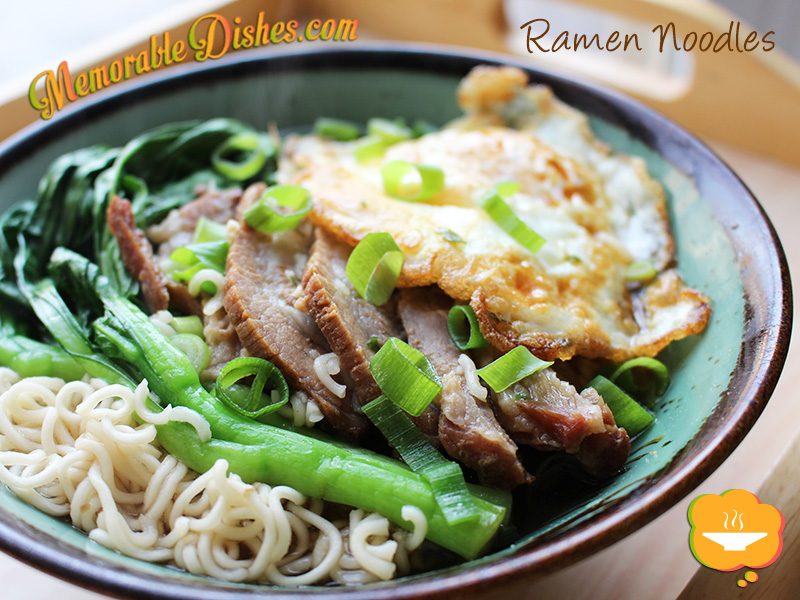
As the weather is getting cooler, I crave for a bowl of hot ramen noodles. Ramen noodles – not the fancy kind you eat at Japanese restaurants where they brew the broth with pork bone and meat for hours. But the instant kind. Every Asian household always has instant ramen noodles stocked up in their pantry at all times. Thus, instant ramen noodles should be a Memorable Dish for all Asians.

Instant ramen noodles is a comfort food to many Asians growing up. We know it’s not the healthiest thing on earth but we just love it. Asians don’t just eat the plain ramen noodles right out of a package but have extra add-ons to make the noodles extra yummy. Plus, if you are making them for your friends and family, it creates the illusion that you made some effort in cooking this dish and not just boiling instant noodles.

I personally blanch the noodles and rinse it with cold water and then reheat the noodles with the broth. If you don’t want to do that, just cook the ramen according to the package. I happen to have some of my homemade leftover Chinese BBQ Pork so I put that, veggies and a fried egg as my toppings. Put your favourite ingredients on your ramen and enjoy!
Ramen Noodles

Ramen Noodles

Prep Time: 5 minutes

Cook Time: 10 minutes

Total Time: 15 minutes

Serving Size: 1

Ingredients

  • 1 pack instant Ramen
  • Slices of leftover or fresh meat (chicken, beef, pork, etc.)
  • Fresh Vegetables
  • Fried Egg
  • Slices of Scallions (optional)

Preparation

  1. Boil the ramen according to the package.
  2. Top with cooked meat, vegetables, fried egg, scallions or any desired topping.
  3. Eat and enjoy!
https://www.memorabledishes.com/ramen-noodles/

Chocolate Chip Banana Bread

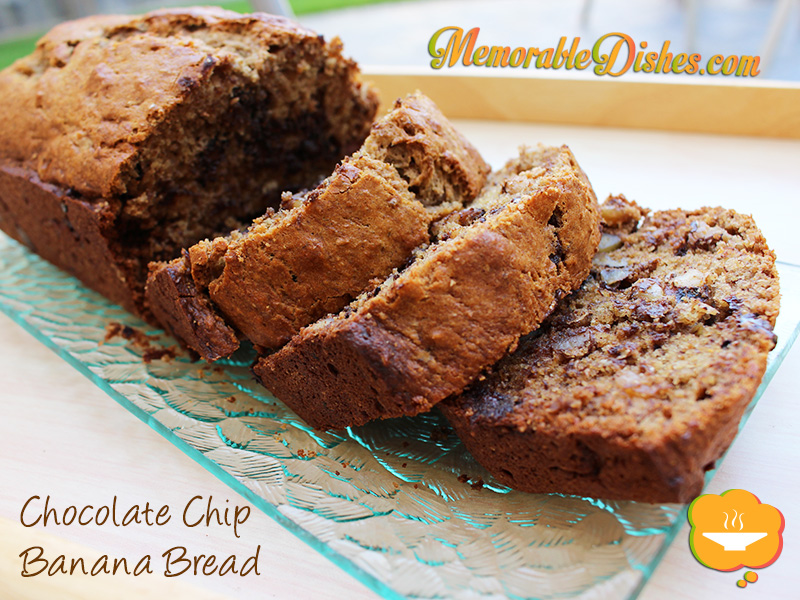
At one time or another we have overripe bananas that we don’t know what to do with. Hence, a lot of us have our go-to banana bread recipes that we use to make leftover bananas into something delicious. This one is my all-time favourite banana bread recipe. I originally found this recipe online but have adapted it to our family’s taste. Since I make this for the kiddies as a snack, I try to use healthier ingredients such as coconut oil and whole wheat flour. However, if you don’t like the taste of coconut oil or whole wheat flour, you can use butter and all-purpose flour instead.

I find that even if I use coconut oil and whole wheat flour, it’s a very tasty bread. You can also use half of the healthier ingredients and another half with not so healthy ingredients. I’ve tried all combinations of healthy and not so healthy ingredients and the results are pretty similar.

The boys enjoy making this Memorable Dish with me because they get to sneak chocolate chips in their mouths here and there as I’m making it. Of course they enjoy licking the coveted spatula, whisk, spoon and bowl with the leftover batter. As soon as I start making banana bread, my second son brings his little chair to prop himself up to help me.

Sometimes I make this into a loaf or sometimes into muffins. So I include the recipe for both. You just have to adjust the baking time a bit. If you have a good banana bread recipe, please share. I’m always trying to find new ways to make old favourites.
Chocolate Chip Banana Bread

Chocolate Chip Banana Bread

Prep Time: 15 minutes

Cook Time: 60 minutes

Total Time: 1 hour, 15 minutes

1 loaf or 12 muffins

Ingredients

  • 2 large or 3 medium sized peeled Bananas (very ripe)
  • 1/3 cup melted Butter or Coconut Oil
  • 1/3 cup of Sugar
  • 1 Egg, beaten
  • 1 tsp Vanilla Extract
  • 1/2 cup semi-sweet Chocolate Chips
  • 1 cup toasted chopped Walnuts (optional)
  • 1 1/2 cups of all-purpose or whole wheat Flour
  • 1 tsp Baking Soda
  • 1/2 tsp of Cinnamon
  • 1/8 tsp Salt

Preparation

  1. Preheat oven to 350°F.
  2. Butter the 4x8 inch loaf pan or line 12-cup muffin pan with paper liners.
  3. In large bowl, whisk flours, baking soda, cinnamon and salt.
  4. In another bowl, mash bananas with a wooden spoon or whisk.
  5. Add melted butter/coconut oil, sugar, egg and vanilla extract to the mashed bananas to combine.
  6. Then mix in chocolate chips and walnuts (if using).
  7. Pour the wet ingredients into the dry ingredients. Mix the batter but don't overmix (use a fork if you need to). Pour batter into loaf pan or muffin cups.
  8. Bake until loaf or muffins are puffed and wooden pick inserted into center comes out clean, about 20-30 minutes for muffins and 45 minutes to 1 hour for loaf.
  9. Cool for 5 minutes in the pan before taking it out. Continue cooling it on the rack until it’s cool enough to eat.

Notes

You can freeze overripe bananas to be used later. Make sure it’s fully defrosted when making the banana bread.

https://www.memorabledishes.com/chocolate-chip-banana-bread/

Yeung Chow Fried Rice (揚州炒飯)

Yeung Chow Fried Rice

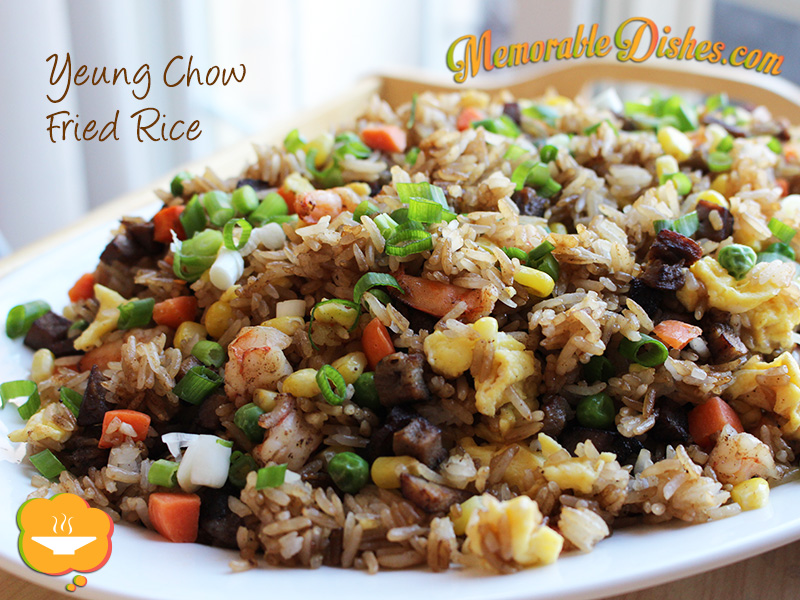
Yeung Chow Fried Rice derives from the city of Yangzhou, Jiangsu province of China. I believe it’s one of the most popular Cantonese rice dish in the West. In every Chinese restaurant, there is Yeung Chow Fried Rice on the menu. Who wouldn’t love it? It has a taste of everything—bbq pork, shrimp, eggs and veggies.

If you ask my husband what his favourite Chinese food is he would definitely say, “Yeung Chow Fried Rice!” Every time we go to a Chinese restaurant, he wants to order Yeung Chow Fried Rice. When he heard that I was making this for the blog, he was disappointed that he wouldn’t be able to taste this Memorable Dish because he had to fly out for work. I told him I was going to save him some if the boys hadn’t devoured it all.

The kiddies also love Yeung Chow Fried Rice. Actually they love eating any type of fried rice. I think the crispiness of the rice combined with the meat and vegetables give their mouths a sensation overload that they enjoy. They can eat bowls and bowls of it! When they eat fried rice, they are like little machines scooping big mouthfuls at a time into their mouths.

You can easily make this Memorable Dish right in your own home. Either buy Chinese BBQ Pork from the Chinese BBQ shop or major Chinese grocery store. If you have time, make your own Chinese BBQ Pork from my recipe. Frankly, I think it tastes better when you make this fried rice at home. I find that restaurants skimp out on the ingredients and the meat to rice ratio is too low. I’ll bet you can’t just eat one bowl of this yummy fried rice 😉Yeung Chow Fried Rice

Yeung Chow Fried Rice (揚州炒飯)

Prep Time: 15 minutes

Cook Time: 15 minutes

Total Time: 30 minutes

Serving Size: 4

Ingredients

  • 5 cups of day-old Cooked Rice (2 cups of uncooked rice)
  • 2 cups of Chinese BBQ Pork (Char Siu), diced
  • 1/2 cup of Shrimp, diced
  • 2 cups of frozen Peas, Carrots, Corn (thawed)
  • 3 large beaten Eggs
  • Vegetable Oil (1 tsp for eggs, 1 tsp for bbq pork and shrimp, 3 tsp for rice)
  • 1/2 tsp Salt
  • 1 tsp Garlic Powder
  • 1/4 cup low sodium Soy Sauce
  • 1 sliced Green Onion for garnish

Preparation

  1. Heat 1 tsp of oil in a non-stick wok or large frying pan.
  2. Scramble the eggs and set aside.
  3. Using the same wok, heat 1 tsp of oil and fry up the bbq pork until it’s lightly brown. Then add the shrimp to the pork and cook until shrimp just turn pink. Set aside.
  4. Heat 3 tsp of oil and stir fry the rice until it’s heated through.
  5. When the rice turns a bit crispy, add the salt, garlic powder, and soy sauce.
  6. Stir fry the rice a bit more until the soy sauce is mixed in the rice.
  7. Put the pork, shrimp, eggs, and vegetables with the rice.
  8. Stir fry all the ingredients until they are evenly mixed.
  9. Garnish with sliced green onions.

Notes

If you don’t have any day-old rice, cook the rice and cool it in the fridge before making the fried rice for best results. Basically, the rice has to be a bit on the dryer side.

https://www.memorabledishes.com/yeung-chow-fried-rice/

Chinese BBQ Pork (Char Siu)

Chinese BBQ Pork

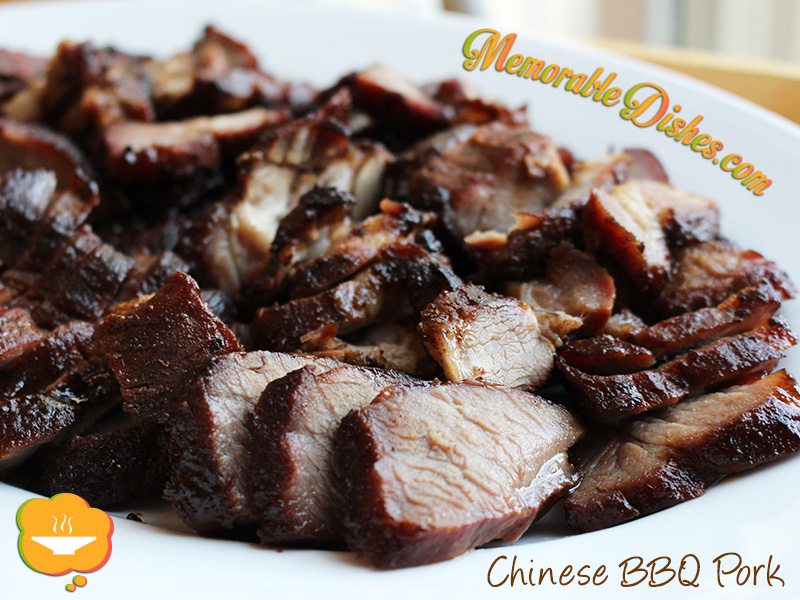
One of the most comforting foods to eat is Chinese barbecue with steamed rice. Roasted Peking duck, Chinese crispy pork, and of course, Chinese BBQ pork. If you live in areas where Chinese BBQ shops are readily available, you’re in for a treat. The BBQ shops hang whole pigs, ducks, chickens, squid, and sausages. They also sell other animal parts that might be tasty to some, but to others, maybe not so yum. I find all Chinese BBQ foods delicious nonetheless :d

My mom makes homemade Chinese BBQ pork at home often. She got the original recipe from my uncle who is a professional chef. In the recipe, the ingredient amount is very high because it is used for restaurants. Also, it uses Chinese units of measurement and a hassle to translate to our measurements. For example, it would say one Chinese pound of hoisin sauce or something like that. So my mom translates one Chinese pound to one tablespoon for home use.

I concocted this Memorable Dish based on my uncle’s recipe and others that I found. I also altered it a bit to suit my own taste. It is fairly easy to make once you find all the sauces at your local Asian supermarket. Even though this is comfort food for me, it can also be a great dish to make for a dinner party or potluck. When people ask if you bought it from the Chinese barbecue shop, you can proudly tell them it’s from your own home bbq shop! Maybe you can even trick them by putting it in a takeout container 😉Chinese BBQ Pork

Chinese BBQ Pork (Char Siu)

Prep Time: 10 minutes

Cook Time: 1 hour

Total Time: 1 hour, 10 minutes

Serving Size: 4-6

Ingredients

  • 2 lbs Pork Butt (Shoulder)
  • 1/2 cup Soy Sauce
  • 2 tbsp Hoisin Sauce
  • 1 tbsp Ground Bean Sauce (磨豉醬)
  • 1 tbsp Chinese Sesame Paste
  • 1 tbsp Shaoxing Wine or Cooking Wine
  • 1 tsp Five Spice Powder
  • 1 tbsp Sugar
  • 3 tbsp Honey

Preparation

  1. Cut pork into 3 to 4 long pieces.
  2. Mix all the marinate ingredients with a whisk in a large bowl and marinate pork for at least 4 hours or overnight.
  3. Preheat oven to 350°F.
  4. Take pork pieces out of marinade and place them on roasting pan to roast.
  5. In the meantime, bring remaining marinade to a boil in a small pot and set aside.
  6. After you roast the pork for 30 minutes, baste and flip the meat.
  7. Roast for another 30 minutes and it should be ready.
  8. If you want to brown the meat a bit, broil the pork for a few minutes. Make sure you keep an eye on it so you don't burn it.
  9. Take it out of the oven and set aside for 5 minutes before cutting into 1/4 inch thick slices.
  10. Use leftover marinade as dipping sauce.
  11. Serve over steamed rice or soup noodles.

Notes

Chinese Sesame Paste is very thick and topped with oil. So when scooping it out of the jar, try not to scoop too much of the oil.

https://www.memorabledishes.com/chinese-bbq-pork/

Show Buttons
Hide Buttons