Author Archives: Winnie N

Mini Fruit Cheesecake

Mini Fruit Cheesecake

Recently my mom mentioned to me how she used to make these mini fruit cheesecakes for us. We had already moved to Canada by then and were in our teens except for my much younger brother. Back in the day when one couldn’t trade recipes by email, my mom would often write her recipes on pieces of paper on hand. (She continues to write recipes on pieces of paper that were lying around because she doesn’t use computers.)

When I asked my mom for the recipe, she handed me this folded and wrinkled piece of paper. This particular recipe was written on the back of a children’s menu where my mom used to work. The kids’ meals were between $2.95 to $3.95. Each meal came with a beverage, choice of sides and a small sundae. (You could imagine how old this recipe was.) A co-worker of hers brought these mini cheesecakes to work and my mom, as curious about new foods as always, asked her for the recipe. Since then, she has been making them for our family on many occasions. I even remember my cousin used her recipe and made these yummy cheesecakes for us too.

Then I thought to myself, “Yeah! My mom used to make these for us all the time! Why hasn’t she made it in awhile?” I remember getting very excited about these colourful fruity mini cheesecakes when she used to make them. I decided to transfer her paper recipe into electronic form hoping that my little ones get as excited as we were when we had this Memorable Dish.Mini Fruit Cheesecake
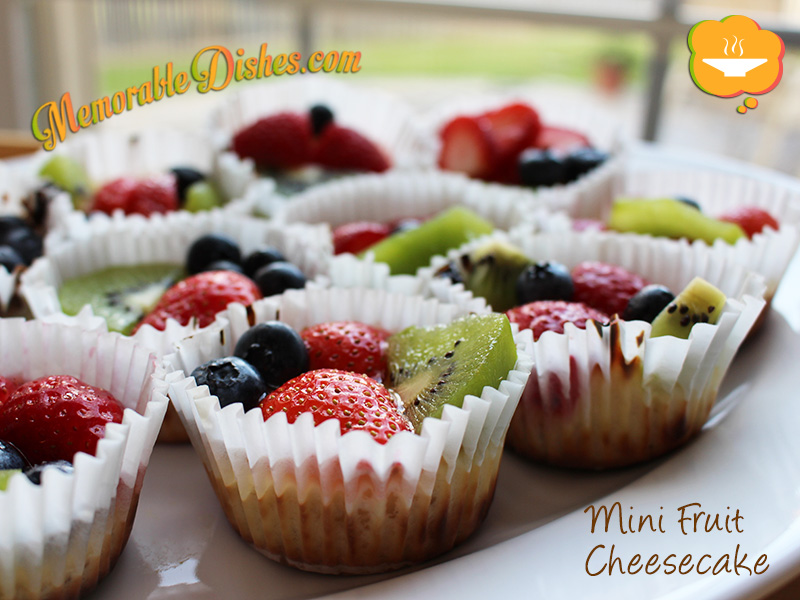
Mini Fruit Cheesecake

Prep Time: 30 minutes

Cook Time: 20 minutes

Total Time: 50 minutes

24 mini cheesecakes

Ingredients

  • 2 packs light Cream Cheese (250 grams each)
  • 2 Eggs
  • 1/2 cup Sugar
  • 1 tsp Vanilla Extract
  • Fruits, sliced (Strawberries, Blueberries, Kiwis, etc.)
  • 2 packets unflavoured Gelatine (each packet is equivalent to 1 tablespoon)
  • 2 cups Apple Juice
  • 24 Vanilla Wafers

Preparation

  1. Beat cream cheese until smooth, add 1 egg and 1/4 cup of sugar at a time. Then add 1 teaspoon of vanilla extract until everything is mixed together.
  2. Line two 12-cup muffin pans with cupcake liners. Put vanilla wafers on the bottom of each cup.
  3. Fill each cup with about 1 tablespoon of cream cheese first and then distribute the rest evenly.
  4. Bake at 350°F for 20 minutes.
  5. Wait until it’s cooled, then top the mini cheesecakes with fruit.
  6. In a small pot, mix the apple juice with the gelatin. Whisk and boil at medium heat until the colour turns clear.
  7. Cool the glaze for 1 minute. Spread the glaze on top of the fruit with a pastry brush or small spoon.
  8. Refrigerate to cool completely.

Notes

Note #1: You can also find unflavoured gelatine from the bulk food store.

Note #2: If you are short on time, bake cheesecake cups a day ahead and top fruit and glaze the same day of serving.

https://www.memorabledishes.com/mini-fruit-cheesecake/

Tomato Beef Stir Fry with Egg
(番茄牛肉炒蛋)

Tomato Beef Stir Fry with Egg

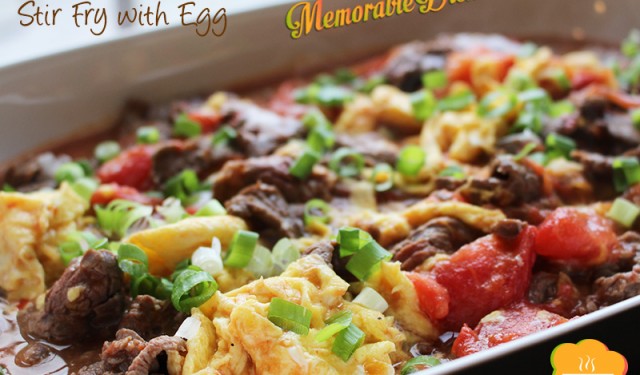
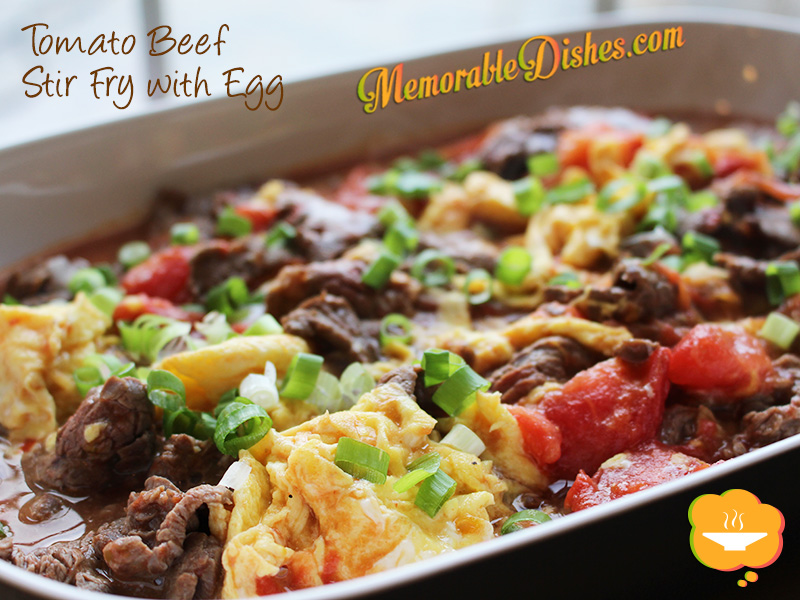
I fondly remember this dish as a child. My mom often cooked it for us because it’s easy to make and tasty to eat. The sweetness of the tomatoes, the tenderness of the beef, and the softness of the egg make this Memorable Dish a favourite of mine.

I started making this dish for my children and it has become one of their favourite dishes too. It is especially great for little ones because kids love the sweetness of the tomatoes and after all, who doesn’t love eggs? If you don’t want to use sliced beef you can use ground beef instead.

This is a homestyle dish that many Cantonese mothers cook for their families. My mother continues making this dish for us big kids and our little kids. I would say this is one of the many staples for our Sunday family dinners. No mother makes this dish the same. I hope you enjoy our family’s version of this Memorable Dish.Tomato Beef Stir Fry with Egg

Tomato Beef Stir Fry with Egg
(番茄牛肉炒蛋)

Prep Time: 20 minutes

Cook Time: 10 minutes

Total Time: 30 minutes

Serving Size: 4-6

Ingredients

  • 1 pound of Beef, thinly sliced
  • 1 tbsp Soy Sauce
  • 1 tsp Sugar
  • 1 tsp Cornstarch
  • 1 tsp Vegetable oil
  • 2 tsp Water
  • 2 cloves Garlic, smashed
  • 1-2 slices of Ginger
  • 4 Tomatoes (approximately 4 cups, cut into 6-8 pieces)
  • 1/2 tsp Salt
  • 1 tsp Sugar
  • 3 Eggs, beaten
  • 3 tbsp Vegetable Oil (1 tbsp for eggs, 1 tbsp for tomatoes, 1 tbsp for beef)
  • 1 tsp Cornstarch
  • 1 tbsp Water
  • 1-2 tsp Soy Sauce
  • 1 stalk sliced Green Onions, for garnish

Preparation

  1. Marinate beef with soy sauce, sugar, cornstarch, vegetable oil and water for at least 30 minutes.
  2. Heat 1 tablespoon of oil in a wok or a large frying pan. Scramble the eggs until they are 80% done. Set aside.
  3. Heat 1 tablespoon of oil. Place sliced ginger first and then cook tomatoes until softened (about 3 minutes). Put 1/2 teaspoon of salt and 1 teaspoon of sugar and mix. Set aside.
  4. Heat 1 tablespoon of oil. Place smashed garlic first and then add the beef. Stir fry the beef until 80% done.
  5. Add the cooked tomatoes and stir with the beef.
  6. Mix 1 teaspoon of cornstarch with 1 tablespoon of water into a small bowl.
  7. Pour cornstarch mixture into sauce until it thickens.
  8. Put 1 to 2 teaspoons of soy sauce in the tomato and beef mixture.
  9. Lastly put the egg in with the tomatoes and beef.
  10. Garnish with green onions and serve on top of steamed rice.

Notes

Note #1: Use flank steak or tender cuts of beef. You can also use ground beef as well.

Note #2: If you would like to remove the skin of the tomatoes, bring enough water to a boil to cover the tomatoes. Boil for 1-2 minutes until you see the skin loosen on the tomatoes. Drain and run them under cold water to cool. Once the tomatoes are cool you can peel the skin off.

Note #3: Take the ginger slices and garlic out of the dish before serving.

https://www.memorabledishes.com/tomato-beef-stir-fry-with-egg/

Lemon Ginger Mint
Green Iced Tea

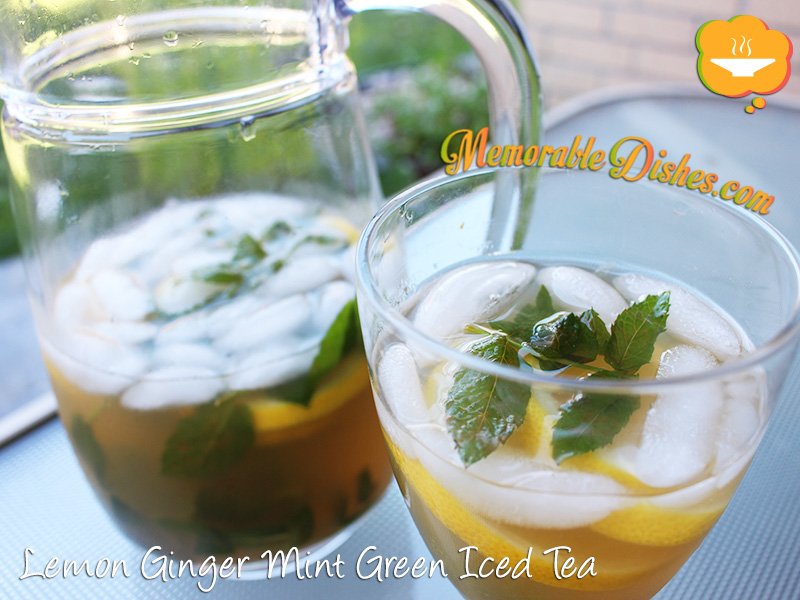
One time I brought this homemade iced tea to the beach, my friend said I should bottle and sell it. I said she must be kidding. When I make iced tea, I don’t usually use a specific recipe. I just make it here and there with whatever ingredients I have on hand. Sometimes I use a combo of lemon and lime slices. Sometimes if I don’t have mint, I just omit it altogether. I just love making and drinking homemade iced tea!

This Memorable Drink is great if you don’t like the traditional black iced tea. I find it lighter and more refreshing. My favourite thing to do is pack it into a giant drink thermos filled with ice and bring it to the beach or picnic. Of course you can enjoy this yummy drink at your own backyard barbeque or just on a hot summer’s day!
Lemon Ginger Mint Green Iced Tea

Lemon Ginger Mint Green Iced Tea

Prep Time: 15 minutes

Total Time: 15 minutes

1 litre

Ingredients

  • 4 cups Boiled Water
  • 4 Green Tea Bags (or loose leaf equivalent)
  • 4 thick slices of Ginger
  • 1 Lemon, sliced
  • 1 cup of fresh Mint Leaves
  • 1/4 to 1/2 cup Honey
  • 4 cups Ice

Preparation

  1. Steep the tea and ginger in boiled water for 5 minutes in a heatproof measuring cup.
  2. If using loose leaf tea, put tea in tea ball or strain loose tea leaves after it’s been steeped.
  3. Pour steeped tea, including the ginger into a large jug.
  4. Stir honey into the steeped tea and mix. (Start off with 1/4 cup first and add more as needed.)
  5. Scrunch up the mint leaves in your hands to release the flavour and put them into the jug along with the lemon slices.
  6. Stir the mixture and bruise the lemon slices up with a wooden spoon in the jug to release more flavour.
  7. Refrigerate until cold.
  8. Once it’s cold add the ice cubes before serving.

Notes

Note #1: Adjust the ingredients to your taste. If you like your tea stronger, steep it longer. If you like it sweeter, use more honey, etc.

Note #2: If you don’t have time to cool the tea in the fridge, use 2 cups of boiled water to steep the tea and 6 cups of ice cubes instead.

https://www.memorabledishes.com/lemon-ginger-mint-green-iced-tea/

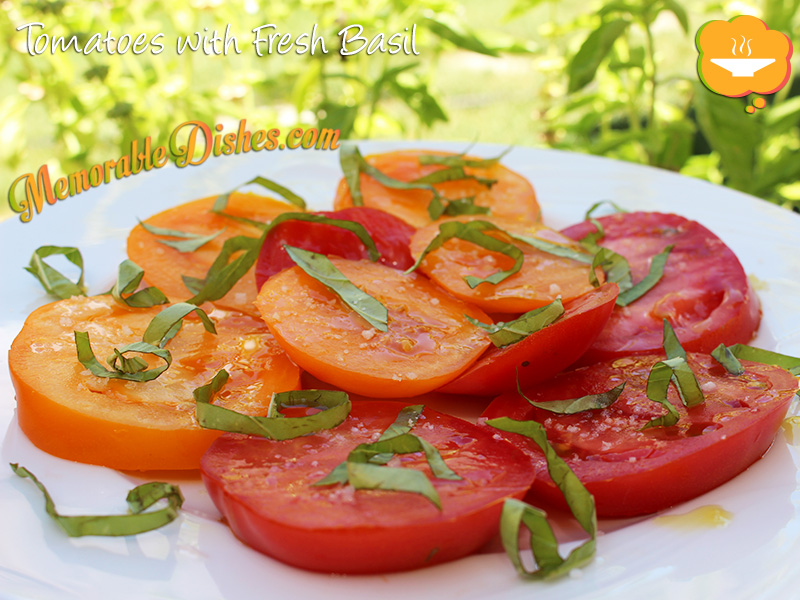
Tomatoes with Fresh Basil

Tomatoes with Fresh Basil

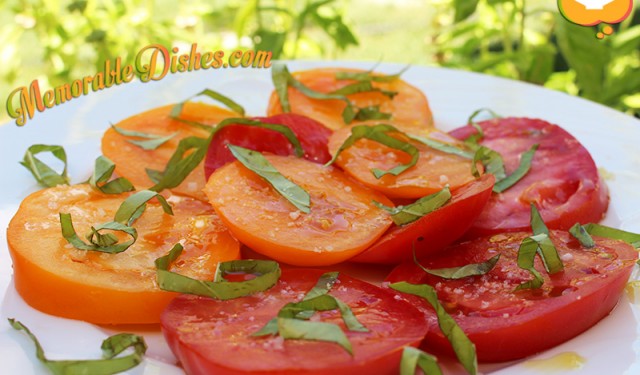
Summer = garden tomatoes + fresh basil + olive oil + fleur de sel = Heaven 🙂

This Memorable Dish post is as simple as the recipe itself. I absolutely adore this dish and can eat it everyday throughout the summer when tomatoes are in season. I prefer the yellow/orange tomatoes because they’re sweeter in taste. Get whatever is available and enjoy the sweet taste of summer.
Tomatoes with Fresh Basil

Tomatoes with Fresh Basil

Prep Time: 5 minutes

Total Time: 5 minutes

Serving Size: 1+

Ingredients

  • Ripe Tomatoes, fresh from garden or from farmer’s market
  • Fresh Basil, chiffonade
  • Extra Virgin Olive Oil, good quality
  • Fleur de Sel or any high quality finishing salt

Preparation

  1. Cut tomatoes into 1/4 inch thick slices.
  2. Scatter the basil on top and drizzle with olive oil.
  3. Sprinkle fleur de sel to taste.
https://www.memorabledishes.com/tomatoes-with-fresh-basil/

Kawartha Settlers’ Village – Cooking in the Olden Days

Kawartha Settler's Village Entrance Sign

A couple of weeks ago, our family stayed at a cottage for a week in the Kawartha’s area. You’d think it would be a pretty relaxing and low-key trip. However, with three young children and meals to plan and prepare for the whole week, it was a semi-relaxed vacation 😉 Luckily, we went with another family so the duties were shared. I love cooking but am not too crazy about cleaning. My friends didn’t care for cooking and didn’t mind cleaning so it was a good match.
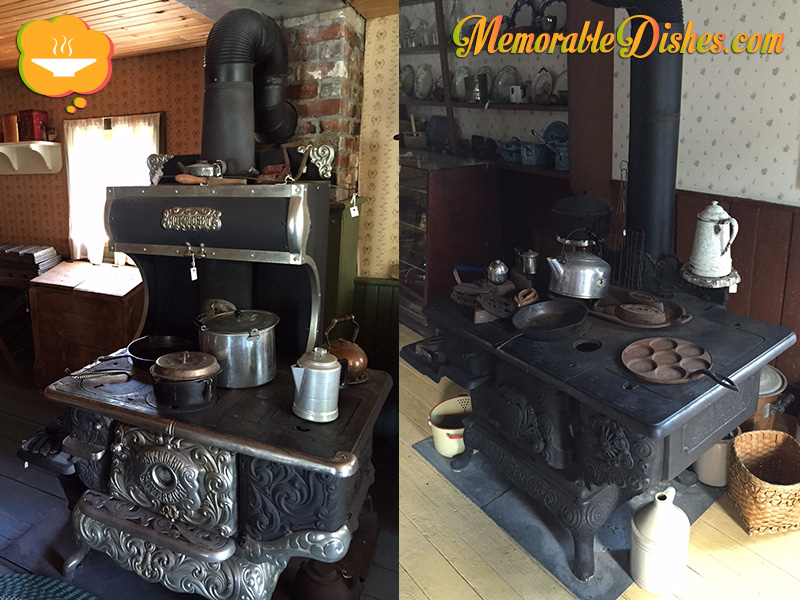
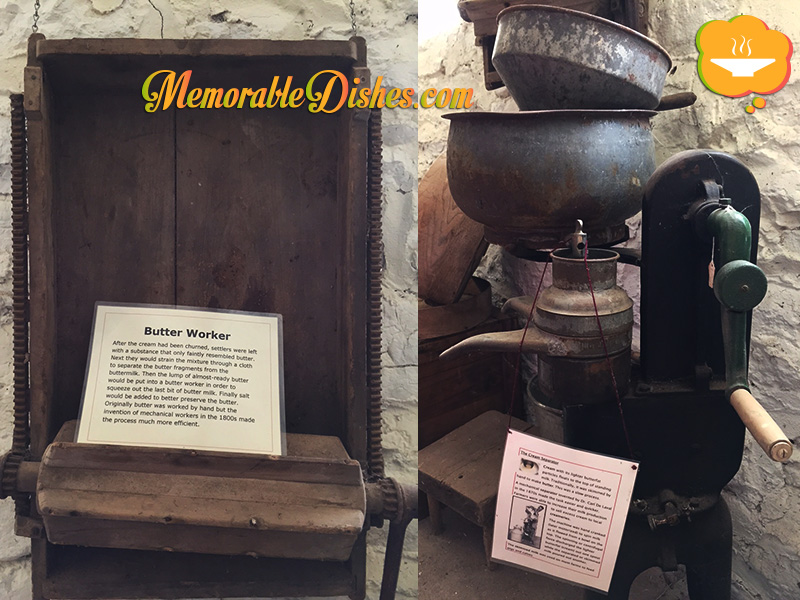
One of the things we did besides playing at the beach, swimming, and fishing, was going to Kawartha Settlers’ Village. To me, that was the highlight of our trip. It was great exploring the village because we got an up close and personal look at how the settlers lived. Some of the buildings were already there, some were brought in from other areas, and some were built on premise. What I found most interesting was, you guessed it, the kitchen. It’s not how you would picture a modern kitchen to be. It’s basically a big room on the ground floor with the stove in the middle. The cooking area is on one side and the sitting area on the other. The stove is situated in a practical place where you are able to cook and warm up the house at the same time.

Kawartha Settler's Village Entrance Sign

Kawartha Settlers’ Village Entrance Sign

I’ve always been fascinated at how people cook from the olden times. I remember visiting my father’s ancestral village and my great aunt showed me the stone stove that my grandmother built for cooking. I was enthralled that she was able to cook with such a basic stove. Now with our fancy kitchens and special equipment for our cooking needs, we are totally spoiled!

Settlers' Stoves

Fancy Stove (left) | Not-so-fancy Stove (right)

After visiting settler’s village, my husband and I couldn’t stop talking about it. I said to him, I wanted to go back without the kids and really spend extra time to learn and explore on how the settlers lived. I really had an amazing time and couldn’t believe how entertaining it was to visit there. Oh yeah, I think the kids had lots of fun too!

Butter Worker and Cream Separator

Butter Worker (left) | Cream Separator (right)

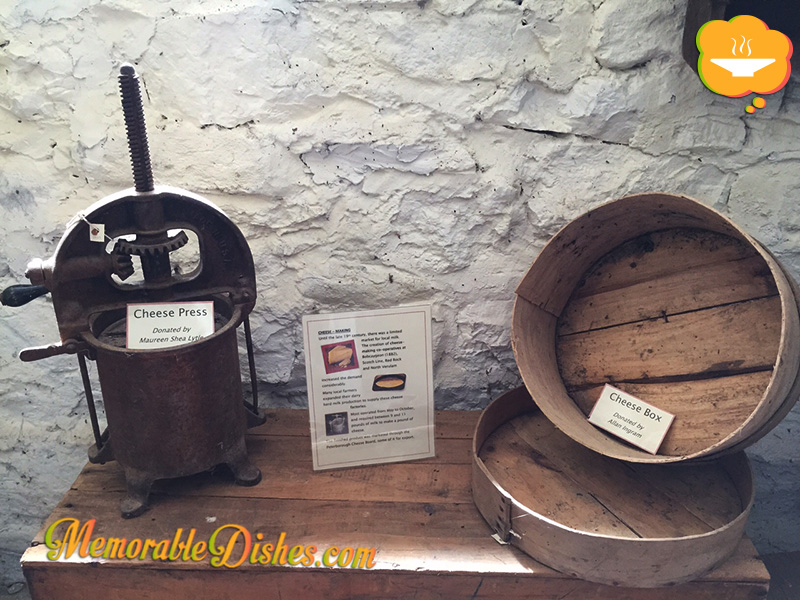
Cheese Press and Cheese Box

Cheese Press (left) | Cheese Box (right)

Giant Frying Pan

Giant Frying Pan

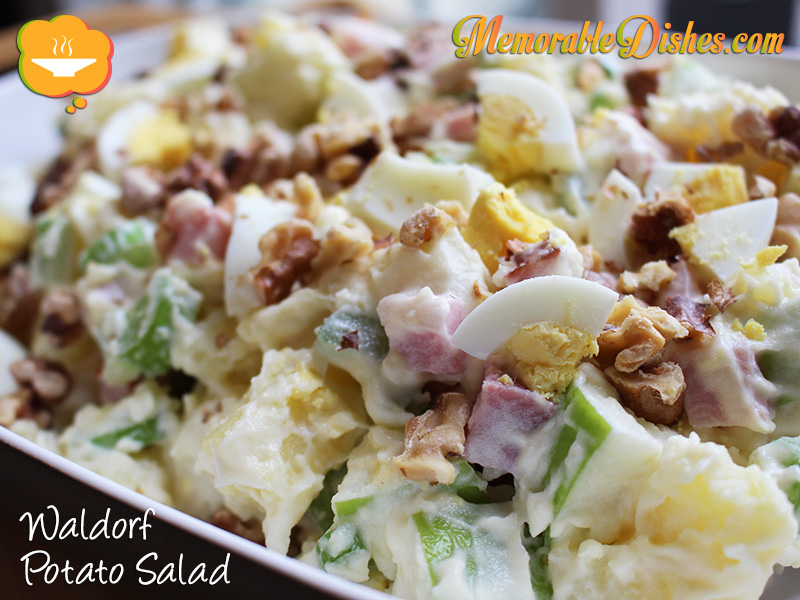
Waldorf Potato Salad

Waldorf Potato Salad

This Waldorf Potato Salad is one of my mom’s Memorable Dishes that she often made for us when we were children. It was also one of her favourite dishes to make for potlucks at our house or to bring to someone else’s home. Every time I think of this salad, I think of potluck parties with our family friends. Maybe my memory is a bit fuzzy but I always equate this salad, along with the Tomatoes Stuffed With Ham Salad, with mahjong parties.

Waldorf salad is generally made of apples, celery and walnuts, mixed in with mayonnaise. My mom used potatoes, eggs and ham in it. But I don’t remember her using celery. Maybe because we didn’t like them as kids or it wasn’t readily available in Hong Kong at the time.

My favourite part when eating this salad was biting into the sweet crunchy apples. My mom used to peel the apples so it was hard to tell whether we were biting into potatoes or apples after the mayonnaise was mixed in with it. It was always a nice surprise when I crunched into the juicy flesh of the apples. I love making and eating this Memorable Dish because it always brings back sweet memories of potluck parties and playing with my parents’ family friends’ kids.

Waldorf Potato Salad

Waldorf Potato Salad

Prep Time: 15 minutes

Cook Time: 15 minutes

Total Time: 30 minutes

Serving Size: 4-6

Ingredients

  • 6 cups Potatoes, cubed
  • 2 cups Apples, cubed (I used Granny Smith.)
  • 2 Eggs, hardboiled
  • 1 tbsp Lemon Juice
  • 1 cup Celery, diced
  • 1 cup Ham, diced
  • 1 cup Mayonnaise
  • 1/2 cup toasted Walnuts
  • Salt & Pepper to taste
  • 8 cups Water (or enough to cover the potatoes)
  • 1 tbsp Salt

Preparation

  1. Bring water to a boil, then add salt.
  2. Put potatoes in salted water and boil until tender (approximately 10-15 minutes).
  3. Drain potatoes and run them in cold running water.
  4. Mix apples with lemon juice to prevent them from browning.
  5. In a large bowl, mix the potatoes, apples, hard-boiled eggs, celery, ham with the mayonnaise
  6. Add salt & pepper to taste.
  7. Top with toasted walnuts.

Notes

Note #1: Use waxy potatoes (they are thin-skinned), such as red or new potatoes.

Note #2: My mom used to peel both the potatoes and apples. I peeled my potatoes but left the skin on the apples for colour.

https://www.memorabledishes.com/waldorf-potato-salad/

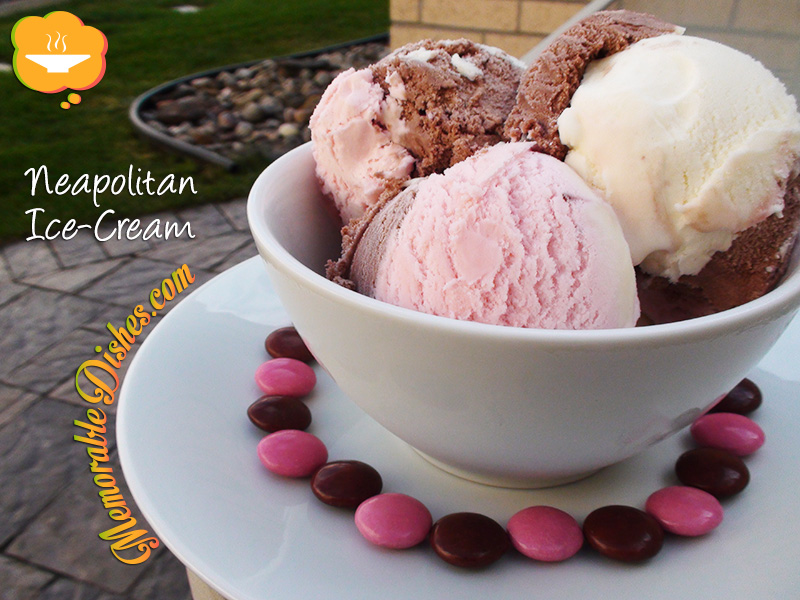
Neapolitan Ice-Cream – My Grandfather’s Favourite!

Neapolitan Ice-Cream

As I searched the grocery store for my grandfather’s favourite ice-cream, the Neapolitan, I thought to myself, do stores still carry this flavour? Have they ousted the common Neapolitan in favour of some new fancy schmancy flavour? But alas, I found it residing harmoniously with all the other ice-creams, common and fancy alike.

Who would’ve thought that flavours such as the Neapolitan still has a place in an ice-cream world of Häagen-Dazs® and Ben and Jerry’s? With all the new flavours and premium ice-cream readily available, it’s easy to forget this “Family Classic” as it is labelled on the Neapolitan carton.

If you are aware of Chinese food culture, people in the older generation don’t like eating cold things. They don’t like eating cold salads or drinking cold water let alone eating frozen ice-cream! Somehow, anything cold is deemed to be not good for you.

Thinking back, it is not surprising how my grandfather embraced eating ice-cream. He was brought up with more Western influences compared to most Chinese men from his generation. He even learned some English and could speak a few words. I feel that my upbringing has been greatly influenced by my grandparents’ progressive thinking for that generation.

As I was taking bites of this ice-cream, for research purposes of course, all the childhood memories came back to me. When we lived in Hong Kong, my grandfather always treated us with a bowl of ice-cream after dinner. When my family briefly moved to the States, he always had ice-cream in the freezer as well. At that time, he upgraded to a new favourite flavour, Rocky Road. But once in awhile, we still got to taste the classic Neapolitan. My grandfather insisted that he bought the ice-cream for us kids but we all knew he really bought it for himself 😉

Neapolitan Ice-Cream

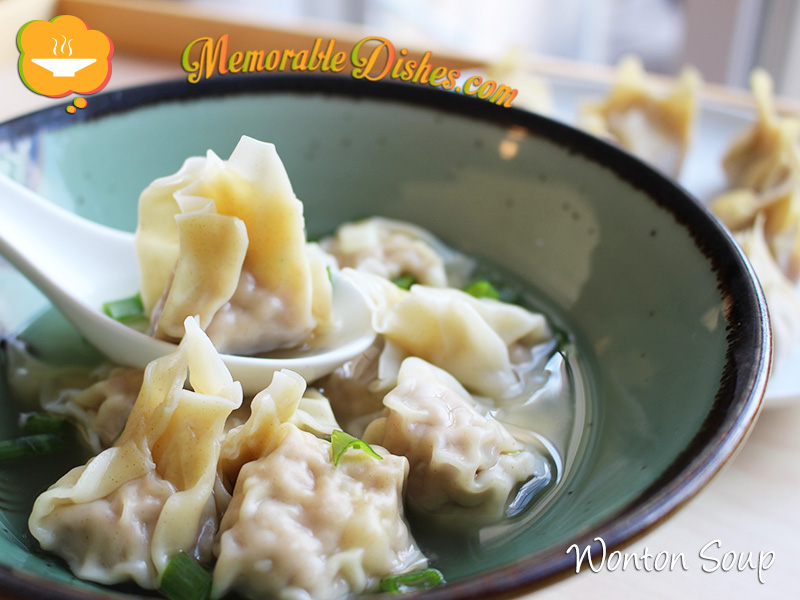
Wonton Soup

Wonton Soup

I believe in most Cantonese Chinese households, girls (and possibly some boys) grow up helping their moms make wontons. I remember making wontons as a kid growing up. I love making wontons! It’s so therapeutic, almost as therapeutic as cleaning squids (or maybe it’s just me 😉

We would sit around the table with a big bowl of meat mixture made up of ground pork and shrimp wrapping away. The inexperienced ones (usually the younger kids) would stuff too much mixture into the wrapper causing the wontons to burst. We always thought there wasn’t enough meat in there. We forgot we still had to close the wrapper after putting the meat in.

If you have witnessed professionals wrapping wontons, it’s like watching a Chinese Speedy Gonzales. You see the beginning and before you know it, it’s finished. Everything in between is a big blur. If there was a video camera to capture this action, it would go something like this (imagine viewing this in slow motion.) Wonton wrapper in hand. The other hand scoops the meat mixture with a knife or chopsticks. Then fast as lightning, smears the meat gingerly onto the wrapper. As soon as the meat mixture leaves the knife or chopsticks, the hand holding the wrapper closes and at the same time pinches the wonton shut.

The people in our family, of course, are not professional wonton wrappers. We would do it at normal speed and sometimes break the wrapper with too much meat or not handling the wrappers delicately enough. It took me about 45 minutes to wrap the whole package of wontons by myself. (You can easily speed up the wonton-wrapping process by recruiting other members of your family or friends.) However, this Memorable Dish tastes so much better than the professional ones because it’s made with love. You can serve wontons by themselves with soup or noodles added.

Wonton Soup

Wonton Soup

Prep Time: 45 minutes

Cook Time: 15 minutes

Total Time: 1 hour

Ingredients

  • 1 pound of Ground Pork
  • 1/2 pound of Shrimp, cut into small pieces
  • 2 tsp of low sodium Soy Sauce
  • 1/2 tsp Salt
  • 1/2 tsp Sugar
  • 1/2 tsp Cornstarch
  • 1/8 tsp White Pepper
  • 1/2 tsp Sesame Oil
  • 1 tbsp Water
  • 1 egg
  • 1 package of Wonton Wrappers (small thin ones)
  • 6 to 8 cups Chicken Broth (if you’re serving noodles with it, you’ll need more)
  • 1-2 stalks of Scallions, diced
  • Small bowl of Water for sealing wontons
  • Water for boiling wontons

Preparation

  1. Mix the ground pork, shrimp, soy sauce, salt, sugar, cornstarch, white pepper, sesame oil, water and egg in a big bowl.
  2. Place a sheet of wonton wrapper on the palm of your hand.
  3. Scoop about 1 teaspoon of meat mixture onto the wrapper.
  4. Lightly wet the edges of the wrapper with a bit of water with your finger.
  5. Close the wonton wrapper by lining up one of the corner to the other, creating a triangle. Then bunch the other corners to the middle creating a small pouch.
  6. Fill your large pot 3/4 full of water and bring it to a boil.
  7. Put the wontons to boil a few batches at a time. Be sure not to overcrowd them.
  8. Once the wontons float to the top (approximately 3 minutes), they are done. Use a slotted spoon and scoop them out. Finish boiling the rest of the wontons. Set aside.
  9. Bring the chicken broth to a boil.
  10. Place the wontons in a bowl and put hot chicken broth on top. Garnish with scallions.
  11. You can also serve the wontons with noodles. Prepare noodles according to package. Place noodles in a bowl, top with wontons. Scoop hot broth over it and garnish with scallions.

Notes

Note #1: Sometimes the wrappers stick together, be careful not to tear them.

Note #2: You can make the wontons ahead or make extras and freeze them on a tray. Put them into bags after they’re frozen. You don’t need to defrost them when boiling. Just boil them a little longer since they are frozen.

https://www.memorabledishes.com/wonton-soup/

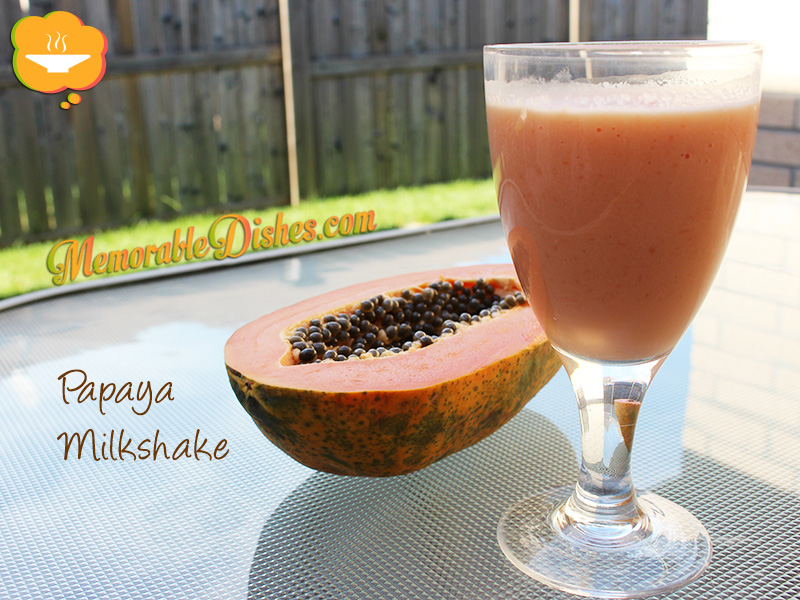
Papaya Milkshake

Papaya Milkshake

Oh how I miss buying papaya milkshakes from Hong Kong vendors and drinking it as I stroll down the streets… In Hong Kong there are lots of food stalls everywhere. One of the things I miss most are the fruit juice stands. They are not really stands but actual small shops that are exposed to the outside. Since Hong Kong is a subtropical city, the vendors are able to sell things this way all year around.

This Memorable Drink triggered memories of my dad always buying us carrot juice from these shops. As a kid, I grew up really liking carrot juice and look forward to getting it every time we go. However, I reminisce about the sweet taste of the papaya milkshake more. I still remember the sound of the supersonic blender as the vendor prepared our made-to-order milkshakes. It’s not the fancy juice bars that you might be familiar with nowadays. Picture a guy, usually wearing a wife-beater shirt (sorry to be politically incorrect) and making our drinks super fast and fresh.

That’s one of the things I miss about living in Hong Kong, when you get thirsty while walking around, boom, there are fresh juice stands (shops) everywhere. As I recreate this Memorable Drink from home, I recollect walking around in the super humid weather of Hong Kong. Even the hot weather could be unbearable at times, the thought of getting a papaya shake sweetens the day.Papaya Milkshake

Papaya Milkshake

Prep Time: 5 minutes

Total Time: 5 minutes

Ingredients

  • 2 cups Papaya, chopped
  • 1 cup Milk (Whole or 2%)
  • 1 tbsp Honey
  • 2-4 Ice Cubes

Preparation

  1. Blend all the ingredients together in a blender.
  2. Imagine yourself in subtropical weather (only pertains to those who live in subarctic climate).
  3. Drink and enjoy!
https://www.memorabledishes.com/papaya-milkshake/

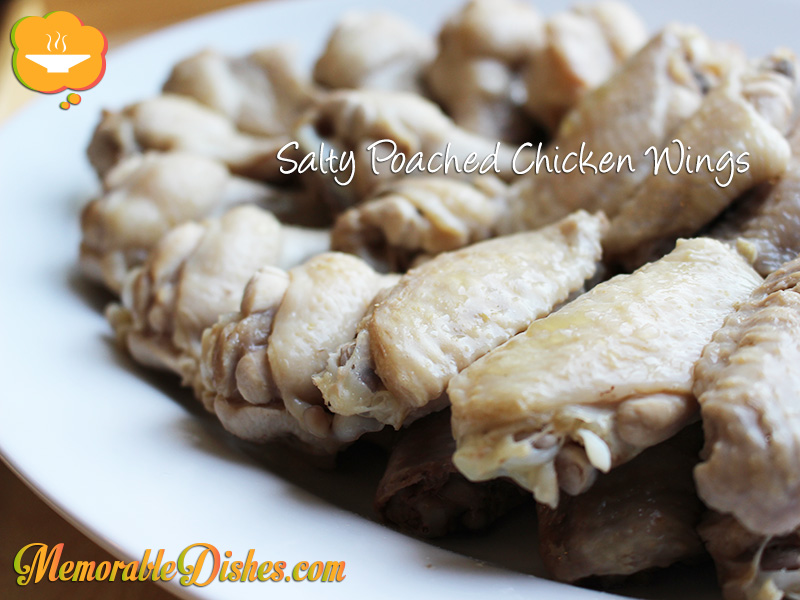
Salty Poached Chicken Wings

Salty Poached Chicken Wings

The thought of poached chicken wings probably doesn’t whet the appetites of many North Americans. North Americans like wings to be crispy and fried. When you fry chicken wings, the fatty skin crisps up and turns the wings into bites of crunchy yumminess. Whereas, when you poach chicken wings, the fatty skin that clings on to the meat of the wing is not a texture North Americans prefer. However, Chinese people love the gelatinous texture of the chicken skin.

This Memorable Dish is another picnic food that I mentioned in my Ginger Scallion Cold Noodles post. My mom used to make these poached chicken wings for potlucks and picnics when we were kids. It’s so easy to make, pack, and eat on the go. I normally take the chicken skin off if it’s steamed or poached. But somehow, I love eating poached chicken wings. Maybe it’s the cold salty taste of the gelatinous texture of the chicken that I love.

If you are Asian, you probably don’t mind the texture of poached chicken with the skin on. If you are not, give this recipe a try! The gelatinous texture is not as unappetizing as it sounds. The taste and texture is almost like a terrine. These chicken wings are meant to be served cold but you can also eat them right away.Salty Poached Chicken Wings

Salty Poached Chicken Wings

Prep Time: 15 minutes

Cook Time: 45 minutes

Total Time: 1 hour

Serving Size: 2-4

Ingredients

  • 2 lbs Chicken Wings
  • 3 tsp Kosher Salt
  • 2 Star Anise
  • 4 slices of Ginger
  • 1 stalk of Scallion, cut into big pieces
  • 2 cloves of Garlic
  • 1/2 cup Chinese Cooking Wine (optional)
  • 1 tsp of Szechuan Peppercorn or Black Peppercorn
  • 6 cups Water for poaching

Preparation

  1. Put all the ingredients except the chicken wings into the water and bring it to a boil.
  2. Once the water is boiled, turn down heat and simmer for 15 minutes.
  3. Turn heat up again and put chicken wings in the poaching liquid.
  4. Once the liquid boils again, turn off heat, cover with lid and let chicken wings sit for 30 minutes.
  5. Serve immediately or refrigerate them to cool.

Notes

Note #1: To avoid scum, you can quickly blanch the chicken wings before poaching them in the poaching liquid.

Note #2: For best results, leave chicken wings in poaching liquid when refrigerating. Refrigerate until cold or overnight. Take the chicken wings out of the cold gelatinous liquid and quickly rinse them under cold water.

https://www.memorabledishes.com/salty-poached-chicken-wings/

Show Buttons
Hide Buttons