Author Archives: Winnie N

Red Bean Popsicle

Red Bean Popsicles

This Memorable Dish is a derivative of a popular Chinese dessert, red bean soup. It is made from boiling red beans or adzuki beans into a soup sweetened with sugar. Actually, I’m not too crazy about this ubiquitous dessert that can be found at every Cantonese restaurant. Maybe it’s because we tend to get it as a complimentary dessert when we order a set meal. That’s why I’m a little bored by it. However, I love red bean popsicles!

Red bean popsicles trigger fond memories of hot summer days in Hong Kong when my mom made them for us as kids. Believe it or not, I still have her original popsicle molds—these plastic molds have lasted for over 30 years! I find that the plastic popsicle molds nowadays are not as durable. I bought new ones a couple of years ago and they cracked already.

Since red bean soup itself is not a favourite dessert of mine, I don’t have the inclination to boil the red beans for this recipe. 😛 Inventive entrepreneurs have allowed me to recreate this Memorable Dish with their canned sweetened red bean paste. How convenient!

My recipe for red bean popsicle has coconut milk in it. Some Chinese restaurants do serve a contemporary version of red bean soup with coconut milk. I tend to like this version better. This super easy popsicle recipe uses only three ingredients.

Red Bean Popsicles

Red Bean Popsicle

Prep Time: 10 minutes

Total Time: 10 minutes

6 Popsicles

Ingredients

  • 1 cup canned sweetened Red Bean Paste
  • 1/2 cup of Condensed Milk
  • 1 cup of Coconut Milk

Preparation

  1. Blend all the ingredients together in a blender.
  2. Fill the popsicle molds.
  3. Freeze for at least 6 hours or overnight.

Notes

My recipe is based on my own popsicle molds with a little extra leftover. Adjust the amount of ingredients accordingly for your own molds.

https://www.memorabledishes.com/red-bean-popsicle/

Ginger Scallion Cold Noodles

Picnic food for Chinese families, at least for our family, is cold noodles. Cold noodles is a relative term because Chinese people like their food super hot. So “cold” noodles can also mean room temperature for us. I remember eating this Memorable Dish at picnics with my family. We would make this simple dish to take along side with my mom’s salty poached chicken wings (I’ll leave that recipe for another post). It’s basically chicken wings that are poached in salty water and perfumed with star anise. These chicken wings can also be served cold, hence another perfect food for picnics.

Ginger scallion cold noodles is also my mother’s go-to dish to make when we do our long drives to the States. These cold noodles definitely remind me of summer. Having picnics and BBQs outside with families and friends. I love the combination of ginger and scallions sizzled in hot oil mixed with soy and oyster sauce. This is my favourite sauce of all time. I can just eat the sauce all by itself!

This Memorable Dish is so easy and versatile. You can use any type of noodles you have on hand. This time, I am using fresh store-bought egg noodles. I usually have Chinese wheat or soba noodles in my pantry and use those to make my cold noodles. I remember my mom even used spaghetti when we didn’t have any Asian noodles in the house. It turned out just as tasty!

Ginger Scallion Cold Noodles

Ginger Scallion Cold Noodles

Prep Time: 10 minutes

Cook Time: 10 minutes

Total Time: 20 minutes

Serving Size: 4

Ingredients

  • 1/2 cup Ginger, julienne
  • 2 cups Scallions, julienne (whites and green separated)
  • 1/4 Cup Vegetable Oil
  • 2 tbsp low sodium Soy Sauce
  • 2 tbsp Oyster Sauce
  • 1 tbsp Sesame Oil
  • 1 lb Noodles

Preparation

  1. Heat oil in a small pot. Test if the oil is hot enough by putting a piece of your ginger in. If it sizzles, put the rest of the ginger in and mix.
  2. Then put the white parts of the scallions in and mix.
  3. Finally put the green parts of the scallions in and mix. Turn off heat.
  4. Put the soy and oyster sauce in and mix. Set aside.
  5. Prepare noodles according to the package. Cook them until al dente.
  6. Drain noodles but do not rinse in cold water.
  7. Put noodles in large bowl and mix with sesame oil to prevent them from sticking.
  8. Then add your ginger, scallions, soy and oyster sauce mixture.
  9. Toss noodles. Serve at room temperature or chill to serve cold.

Notes

Adjust your seasonings according to the type of noodles you use. Depending on the type of noodles used, the sauce adheres to them differently.

https://www.memorabledishes.com/ginger-scallion-cold-noodles/

Almond Blueberry Flaxseed Muffins

Almond Blueberry Flaxseed Muffins

This Memorable Dish has become my go-to muffin recipe. It’s healthy, not too sweet, and light and fluffy. I don’t remember where it originated from. Surprisingly, I didn’t find this recipe online. I think I initially found this recipe from a newspaper—how retro! I’ve modified the original recipe to suit my family’s liking as usual because we don’t like things too sweet.

This Memorable Dish has been a notorious success with my family. I’d make it when my cousins from the States visited. But I preferred to make them ahead of time so that my cousins would have something to eat for breakfast the next morning. One of my cousins enjoyed them so much she asked for the recipe so that she could make it at home. When we had our Canadian and US families gathered for brunch, she made them here in Canada for us! She really likes these muffins 🙂

This Memorable Muffin is made from almond flour (ground almonds) so the kids cannot bring them to school due to a nut-free policy. However, we make them for home and the kids have them for breakfast or as a snack. Now, my third little one will get to taste this yummy muffin for the first time!

Almond Blueberry Flaxseed Muffins

Almond Blueberry Flaxseed Muffins

Prep Time: 15 minutes

Cook Time: 20 minutes

Total Time: 35 minutes

12 Muffins

Ingredients

  • 1 3/4 cup All-purpose Flour
  • 1/2 cup Almond Flour (ground almonds)
  • 4 tsp Baking Powder
  • 1/2 tsp Salt
  • 1/4 cup Ground Flaxseed
  • 1 1/2 cup fresh Blueberries
  • 2 large Eggs
  • 1 cup 2% Milk
  • 2/3 cup Sugar
  • 1/3 cup Almond oil
  • 1 tsp Vanilla Extract

Preparation

  1. Position rack in middle of oven. Preheat oven to 400°F.
  2. Line 12-cup muffin pan with paper liners.
  3. In large bowl, whisk flours, baking powder, salt, and flaxseed to combine. Add berries and stir to coat.
  4. In another bowl, whisk eggs, milk, sugar, oil, and vanilla extract to combine.
  5. Pour egg mixture into berry mixture and gently mix with a fork to moisten dry ingredients. Don't overmix (a few lumps in batter are normal). Pour batter into muffin cups.
  6. Bake until muffins are puffed and wooden pick inserted into center comes out clean, about 20 minutes. Cool 5 minutes on rack before serving.

Notes

Note #1: If you don’t have almond oil on hand, you can also use a neutral tasting oil such as canola oil.

Note #2: I have also used frozen blueberries and the results are the same except the whole muffin turns blue 🙂

https://www.memorabledishes.com/almond-blueberry-flaxseed-muffins/

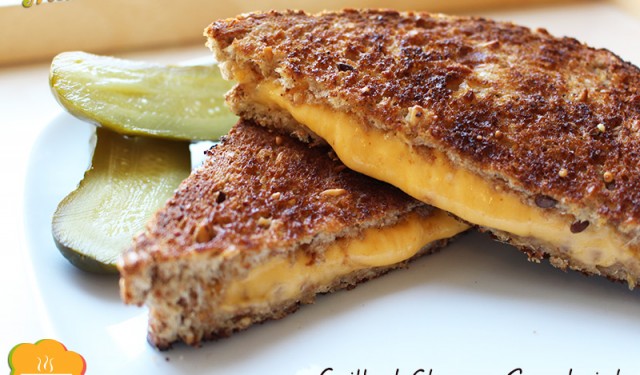
Grilled Cheese Sandwich

Grilled Cheese Sandwich

I’d never had grilled cheese growing up. It wasn’t until my grade 7 or 8 school cooking class when I discovered this Memorable Dish. I loved that cooking class at school! I don’t think we made anything fancy. The only thing I remembered was making grilled cheese. We spread the outside of the bread with butter and the inside with ketchup. Then we peeled the plastic wrap off the processed cheese, (I’m sure if we made this today, the teacher would’ve used real cheese :P) and pan-fried it slowly on the stove. The teacher served the grilled cheese sandwich with a side order of pickles. I thought to myself, “Wow! This is so amazing!” I think I went home and started making grilled cheese after that.

Another discovery I made fairly recently was that a friend of mine makes grilled cheese by broiling it in the oven. Brilliant! Why didn’t I think of that? She also introduced me to a sautéed mushroom version – yum! The kids demand to have grilled cheese at my in-laws every time they stay over. (Maybe I don’t make it enough at home? 🙂

Here’s an easy version you can make by broiling it in your oven. I find it a great way to make lots of sandwiches fast. Just make sure you keep an eye on the oven so you don’t burn them! If you do, just scrape off the burnt parts with a knife and they’re good as new 😉

Grilled Cheese Sandwich

Grilled Cheese Sandwich

Prep Time: 10 minutes

Cook Time: 10 minutes

Total Time: 20 minutes

4 Sandwiches

Ingredients

  • 8 slices of Bread (I use whole wheat)
  • 2 cups grated Cheddar Cheese
  • Softened Butter

Preparation

  1. Grate cheddar cheese.
  2. Butter one side of the bread.
  3. Place 4 pieces of bread, buttered side down on a baking pan/cookie sheet.
  4. Put 1/2 cup of grated cheese on each piece of bread.
  5. Then place the remaining bread on top of the cheese, buttered side up.
  6. Broil on one side until brown (approximately 3-4 minutes).
  7. Move or rotate your pan to brown evenly.
  8. Flip the bread and broil the other side until brown.
https://www.memorabledishes.com/grilled-cheese-sandwich/

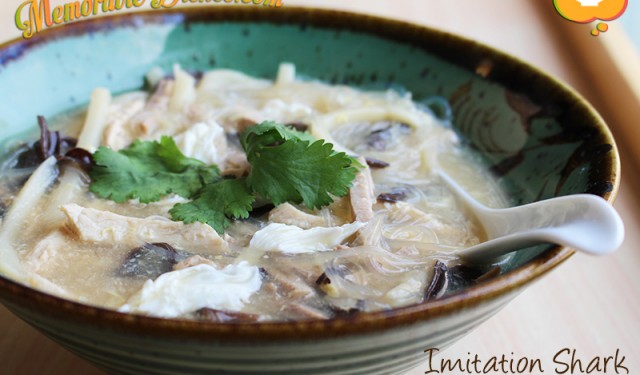
Imitation Shark Fin Soup (碗仔翅)

Imitation Shark Fin Soup

Even before it was politically incorrect to eat shark fin soup, I’ve always liked the fake version better. Maybe it was the extra MSG or maybe I was super hungry. But this is one of my favourite Memorable Dishes eaten on the streets of Hong Kong as a child. My older brother and I ate this on the streets after swimming. The street vendor had his (probably unlicensed) cart outside of the public swimming pool waiting for hungry post-swimming patrons. He definitely knew who his target audience was! I, like everyone else gets super famished after swimming, that’s why the street imitation shark fin soup was especially tasty and delicious.

When I found this hawker (street vendor) Memorable Dish at T&T (Chinese grocery store chain in Canada), I couldn’t believe it! I hadn’t eaten this soup in so long and when I discovered it, I was super ecstatic. It was still piping hot from its container when I brought it home. I devoured it and thought of my famished self after swimming in Hong Kong when I was little.

When researching for this recipe, I found a couple of versions. One where they use crab meat and store-bought imitation shark fin and another where shredded chicken, pork, and cellophane noodles are used. I adapted my recipe from both of these versions.

Eating this Memorable Dish brought back vivid memories of when my dad took my older brother and I swimming. Every time we went swimming, I looked forward to eating this hot soup filled with yummy goodness. After rediscovering this dish at the supermarket, I knew it wasn’t just about childhood memories. I genuinely enjoyed this dish! The texture of the crunchy black fungus and the meaty goodness soup warms up my mouth and enters into my soul.

Imitation Shark Fin Soup

Imitation Shark Fin Soup (碗仔翅)

Prep Time: 30 minutes

Cook Time: 30 minutes

Total Time: 1 hour

Serving Size: 4-6

Ingredients

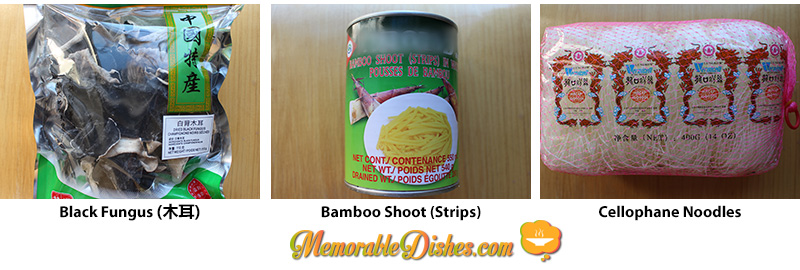
  • 1 cup Imitation Shark Fin or Cellophane Noodles
  • 1 1/2 cup poached Chicken Breast, shredded
  • 1 1/2 cup poached Lean Pork, shredded
  • 1 cup reconstituted Dried Black Fungus (木耳) thinly sliced (see Note #1)
  • 1 cup canned Bamboo Shoots (strips)
  • 1 Egg
  • 6 cups Chicken Broth
  • Cornstarch Solution (combine 2 tbsp cornstarch with 4 tbsp water)
  • ¼ cup Soy Sauce
  • Salt to taste
  • Dash of White Pepper
  • Dash of Black Vinegar
  • Coriander or sliced green onions for garnish (optional)

Preparation

  1. If you are able to find imitation shark fins, blanch them by pouring boiling water over it and leaving it covered for about 5 minutes. Discard water, drain the fins and set aside.
  2. Bring chicken broth to boil in a pot. Add sliced black fungus and bamboo shoots, and simmer for about 5 minutes.
  3. Add chicken, pork and blanched shark fins (if using). Bring to a simmer for another 3 minutes.
  4. If using cellophane noodles only, put them at the very end because it cooks super quick.
  5. Before using cornstarch solution, stir again to dissolve mixture. Slowly pour in the cornstarch solution while stirring until you reach the consistency desired. Add soy sauce and season with salt to taste.
  6. Lastly, slowly pour beaten egg to the soup mixture. Turn off heat.
  7. Dish the soup into serving bowls. Garnish with coriander or sliced green onions (if using). Put dash of white pepper and black vinegar to taste.

Notes

Note #1: Use approximately 4 medium size black fungus. It really depends on how big your black fungus is. Soak the black fungus in hot water to soften. Cut around and discard the hard part. Then slice the fungus into thin strips. If you are unable to find black fungus or don’t want to use them, you can use shiitake mushrooms instead. The texture will be different since black fungus is crunchy and the shiitake mushrooms are soft.

Note #2: Poach the chicken and pork in water and you can use the poaching liquid as part of your broth.

Note #3: For thicker soup, add more cornstarch solution. For a thinner soup, don’t add as much solution.

https://www.memorabledishes.com/imitation-shark-fin-soup/

Imitation Shark Fin Soup - 3 pix

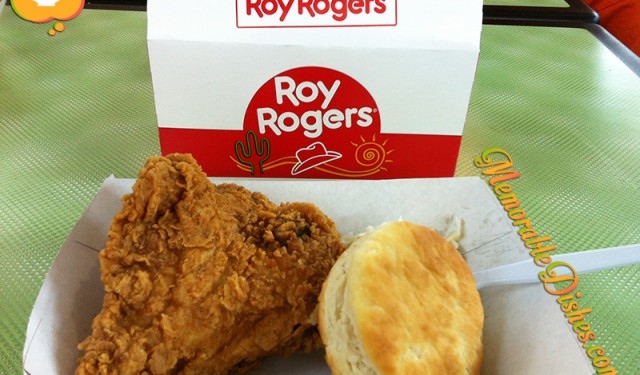
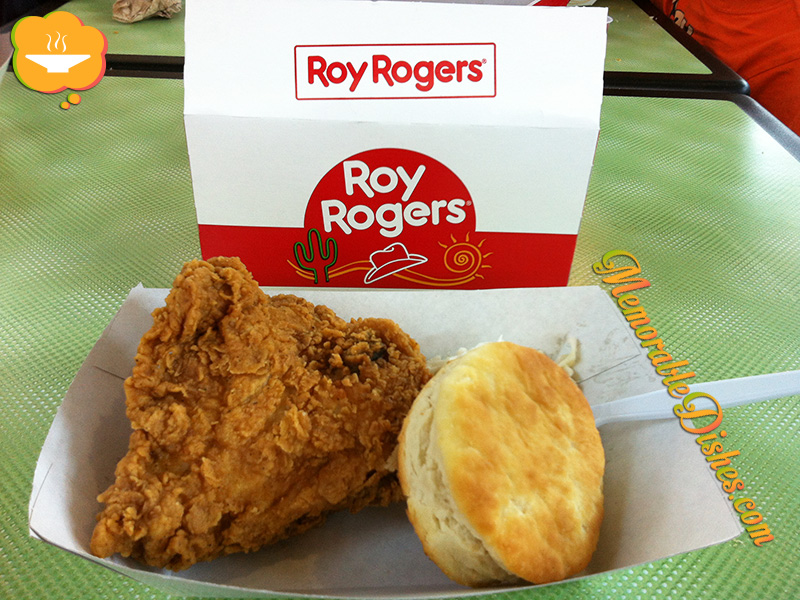
Roy Rogers Fried Chicken

Roy Rogers Fried Chicken

Two summers ago, our whole family drove to the States (New Jersey area, close to Philadelphia) to visit my uncles, aunts and cousins. When I say the whole family, I mean we rented a 11-passenger van to fit everyone!

One of our missions on every road trip to the US is to find the elusive Roy Rogers fast-food restaurant. They are famous for their fried chicken and roast beef sandwiches. Every time we’ve visited, my older brother and I HAD to eat their chicken. We even got my younger brother, who didn’t live there when he was little, to share our enthusiasm for Roy Rogers fried chicken. My uncle always wondered why we kept wanting to eat there. He said, “Church’s Chicken is better!” But eating at Roy Rogers brought back fond memories for my older brother and I because it was one of the fun outings with my cousins when we lived in the States.

Roy Rogers has since disappeared from the Philadelphia landscape. They’ve been overtaken by newer and perhaps better fried chicken places. Now it seems like they mostly reside at service stops throughout interstate highways or in certain parts of Philadelphia.

After crossing the border from Canada to the US, our first sighting of Roy Rogers was the second service stop at Clifton Springs. Of course, we were super hungry after we crossed the border and couldn’t wait so we ate at the first service stop instead. Shucks! Every time we go, we forget it’s the second service stop!

We didn’t get to eat at any Roy Rogers chicken during our stay in New Jersey and Philadelphia. But alas, on our drive back, we stopped at the Allentown Service Plaza and devoured the much anticipated Roy Rogers fried chicken! I honestly don’t remember if it tastes better than any other franchised fried chicken restaurants. It’s not the taste or aroma of the chicken that brings back my childhood memories. It’s eating it with my family that does. Hunting for Roy Rogers has become a family tradition. This fried chicken has become a collective Memorable Dish of my brothers and I. I can’t wait for our next road trip to the States again!

Roy Rogers Fried Chicken

Tuna Casserole

Tuna Casserole

You’d be surprised that I run out of food at my house. Yes, I do cook a lot but I try to buy fresh food as much as possible. I have nothing against the freezer. I do buy meat in bulk and freeze it. I make baby food and freeze it. And I buy frozen veggies and other frozen instant products when I’m in a food jam. But on one cold winter’s day, I actually had no meat in the freezer. I didn’t want to venture out to the grocery store in deep-freeze weather. What to do?…What can I make?…Tuna casserole!

Since I didn’t grow up with a North American mother, tuna casserole was not a childhood dish of mine. I don’t quite remember when I was first introduced to it. I might’ve eaten it at a friend’s house or I might’ve made it by myself since it’s such an easy dish to whip up. I didn’t discover tuna casserole until I was much older.

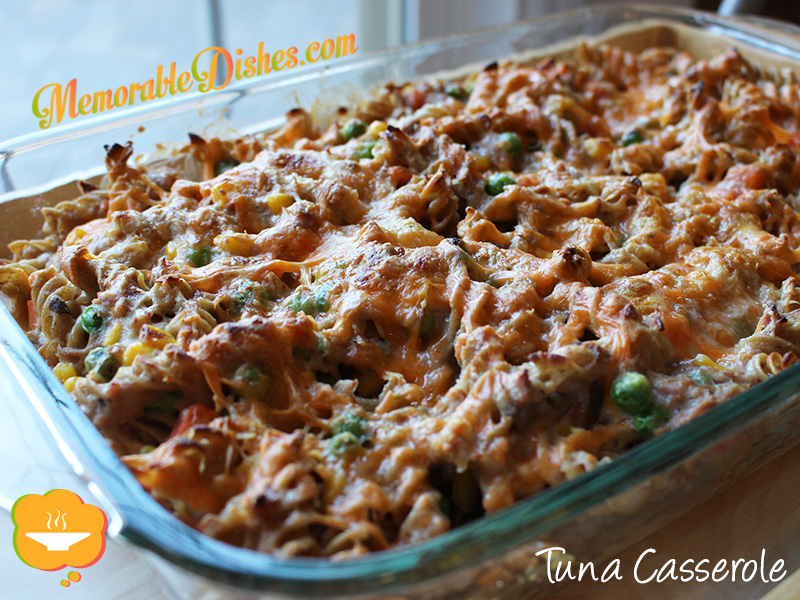
This seems like a dish of yesteryear when everyone today is eating designer foods. But there’s a comfort and simplicity to this dish. A can of cream of mushroom soup, cans of tuna and egg noodles (I use whole wheat rotini pasta). I also use grated cheese as a topping instead of the usual bread crumb topping I’ve seen in other recipes.

Whether you’ve had tuna casserole while growing up or never had it, give it a try! You can stock the items in your pantry and freezer and cook it in a pinch. Or like me, when you run out of meat in the house!

The first time I served this dish for the kids, they exclaimed, “We used to have this at daycare!” That was heartwarming to hear that they recollect eating this Memorable Dish at daycare where the ladies who cared for them were like family.

Tuna Casserole

Tuna Casserole

Prep Time: 10 minutes

Cook Time: 20 minutes

Total Time: 30 minutes

Serving Size: 4

Ingredients

  • 1 box whole wheat Rotini Pasta (375 g)
  • 1 can Cream of Mushroom Soup
  • 1 cup Milk
  • 2 cans Tuna (7 oz can)
  • 2 cups frozen mixed Vegetables
  • 2 tsp Olive Oil
  • 1 cup grated Cheddar Cheese
  • 1/2 cup grated Parmesan Cheese

Preparation

  1. Preheat oven to 400°F.
  2. Boil the pasta based on the instructions found on the package.
  3. Drain the pasta into a colander and mix with olive oil to prevent from sticking.
  4. In a large bowl, mix the mushroom soup, milk, tuna (drain the liquid) and vegetables together.
  5. Put the pasta into the mixture and mix until everything is combined.
  6. Pour tuna mixture and pasta into a baking dish and top with cheeses.
  7. Bake for 20 minutes or until pasta is bubbling.
https://www.memorabledishes.com/tuna-casserole/

Circle of Food – Peking Duck Noodle Soup

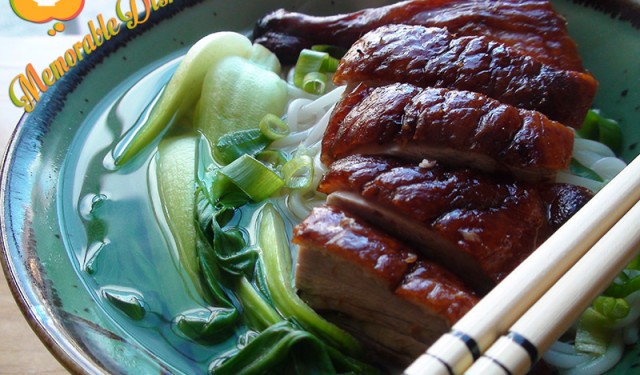
Peking Duck Noodle Soup

My kids love eating at food courts inside of Chinese malls. I guess they love eating in any food court for that matter. They get very excited because it’s a treat and there are lots of places to choose from. What makes the Chinese food courts unique is the fact that they are all individually-owned. It’s a nice break from the franchised restaurants that we are used to at regular malls. It almost feels like we are eating on the streets filled with different food vendors, but in an enclosed and comfortable seating environment.

We often order dishes from different shops so we get to try everything. Since being a parent with young kids, I’ve ordered foods that the kids would eat, but not necessarily what I like to eat. Just the other evening, I went to the Chinese food court with my kids and my mom. As always, I ordered something the kids wanted to eat – fried noodles. I didn’t really want that but ordered it anyways. My mom ended up ordering what I normally like to eat – Peking Duck Noodle Soup. Maybe she wanted to eat that but I got a feeling she ordered it because of me 🙂

This brought back memories of when my mom and I were on a plane ride flying to Hong Kong. I loved that you got to choose between Western or Chinese entrées. For breakfast, there was a choice between congee or omelette. I ordered the omelette and my mom ordered the congee. I took a bite of the omelette and didn’t like it. Without a second thought, my mom gave me her congee. (Just so you know, I was a full-grown adult when it happened). I just voiced my dislike for the omelette and she gave me the congee right away!

I do the same for the kids now. I eat their food when they don’t finish it or I trade with them if they don’t like something. It’s like the circle of life or what I’d like to call – the circle of food. Parents always put their kids’ needs first no matter how old they are.

Just so you know, I have not attempted to make Peking duck at home. Even if I did, it would not taste the same as the ones you’d find at your typical Chinese BBQ shop. The method, technique, equipment and all that is involved in making a Peking duck is an art form. You can find Peking ducks sold at Chinese BBQ shops, Chinese restaurants that specialize in BBQ, or at select Chinese grocery stores. Once you buy your Peking duck, this dish is super easy to prepare and very comforting to eat.
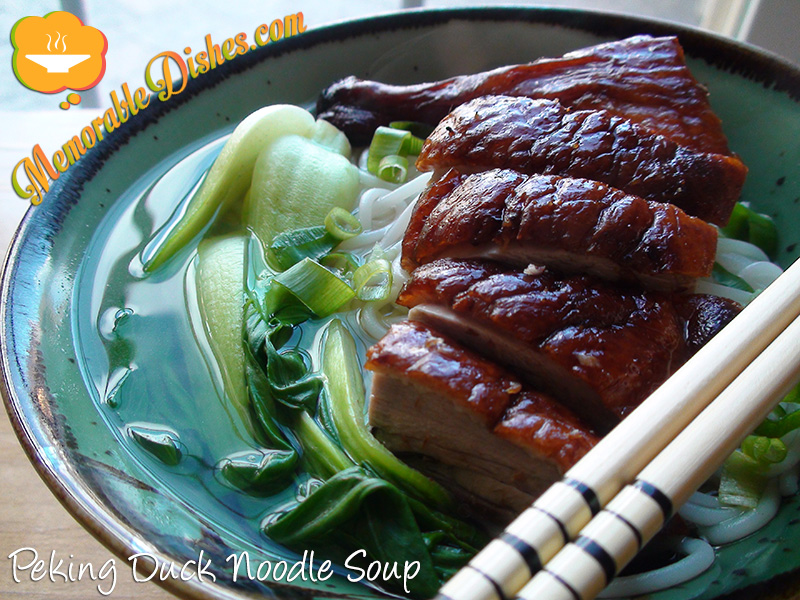
Peking Duck Noodle Soup

Peking Duck Noodle Soup

Prep Time: 15 minutes

Cook Time: 20 minutes

Total Time: 35 minutes

Serving Size: 4

Ingredients

  • 1/2 Roasted Peking Duck*
  • 1 package of Jiang Xi Rice Vermicelli
  • 8 small stalks of Shanghai Bok Choy (Wash and cut in half.)
  • 5 cups of homemade Chicken Stock or store-bought Chicken Broth
  • 2 slices of Ginger
  • 2 cloves of whole Garlic
  • 2 stalks of Green Onion (Use the white part to infuse the broth and thinly slice the green parts as garnish.)
  • *You can buy ½ or whole roasted Peking ducks at Chinese BBQ shops. Don’t forget to ask for extra plum sauce.

Preparation

  1. Boil the vermicelli based on the instructions found on the package.
  2. Drain the vermicelli into a colander and rinse it with cold water.
  3. Put ginger, garlic, white parts of the green onion into the stock/broth and bring it to a boil. (You can take them out after the broth has been infused with these flavours.)
  4. Once the broth is boiled, add the Shanghai bok choy and boil for a minute or so.
  5. Then add the cooked vermicelli.
  6. Once the broth is boiling again. Turn off heat.
  7. Divide up the noodles and bok choy into bowls. Top with broth and sprinkle sliced green onions on the top.
  8. You can place the Peking duck on top of the noodles or you can place them on the side.

Notes

Note #1: If you cannot find Jiang Xi Rice Vermicelli, use whatever rice vermicelli is available at your grocery store. Alternatively, you can always use any type of egg noodles as well.

Note #2: From my package of Jiang Xi Rice Vermicelli, it says to cook for 6-8 minutes. I have to cook them for 10-12 minutes for them to be al dente to soft. Test them out before draining the vermicelli to get the right consistency.

Note #3: If you cannot find Shanghai bok choy, you can use baby bok choy or any type of vegetable that you like.

https://www.memorabledishes.com/peking-duck-noodle-soup/

Jiang Xi Rice Vermicelli
Jiang Xi Rice Vermicelli
 

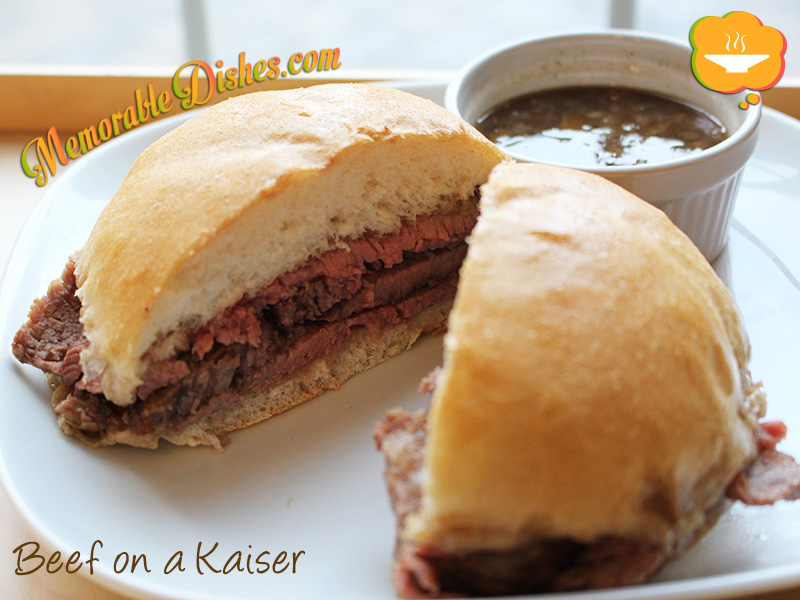
Beef on a Kaiser

Beef on a Kaiser

Guess where I had the most amazing beef on a kaiser? It was at a suburban mini mall in Scarborough called Agincourt Mall more than twenty years ago. Gosh, I am THAT old! At the time there were no places to eat except in this cafeteria-style restaurant. You know the ones where you pick up a tray, pick a salad from the cold food section, order your hot food from the person behind the counter and slide your tray at the end of the line to pay for your meal.

My mom would take my older brother and I to this mini mall to shop and eat. We went back frequently along with my younger brother even after we moved out of the neighbourhood just to eat their beef on a kaiser. Some time later they sold their business to another owner and converted the cafeteria-style restaurant into a full-fledged restaurant. Unfortunately, we tried ordering the beef on a kaiser and it wasn’t the same in either taste or experience.

Even though this joint is like a relic by today’s standards, I loved the whole experience of eating there. I especially enjoyed watching the man behind the counter assembling our sandwiches. Not only was he fast but there was a grace to it. I wish I could show you a video of him preparing the sandwich because my descriptions don’t do it justice. First, he cut the kaiser bun in half. Then he pierced the top half of the bun with his carving fork and dipped it quickly into the au jus without soaking up the bun. Then he cut thick pieces of beef on the what I believe was a prime rib roast on the bone and lay the meat on the bottom half of the kaiser. At last he took the top half of the bun and dipped it quickly into the au jus, put it on top of the beef and cut our sandwich in half. He made our sandwiches so perfectly and quickly that you’d think it was to be served at a fancy restaurant.

When this Memorable Dish was triggered my mind, I thought to myself, “How am I going to make this?!?!” I didn’t even know what cut of beef or spices the restaurant used! I tried recreating it based on recipes I found online. I think the restaurant used prime rib beef because they always gave my mom the rib bone with her sandwich. (They only gave the rib bone to their favourite customers, at least we liked to think so 😉

I’m satisfied with the results of this recreated sandwich. Both my mom and younger brother agree that it’s pretty close to what we had at the restaurant. I am so happy that we got to recollect this Memorable Dish together and can’t wait to make it next time for my older brother 🙂

Beef on a Kaiser

Beef on a Kaiser

Prep Time: 30 minutes

Cook Time: 1 hour

Total Time: 1 hour, 30 minutes

6 Sandwiches

Ingredients

  • 1 Prime Rib Roast (approximately 4 pounds)
  • 1 tbsp Olive Oil
  • 2 tsp Kosher Salt
  • 1/4 tsp Black Pepper
  • 1/4 tsp Garlic Powder
  • 6 Kaiser Rolls
  • For Au Jus
  • 1 small diced Onion
  • 2 minced Garlic
  • 2 tsp of Olive Oil
  • 3 cups of Beef Broth
  • 1/2 tsp Worcestershire sauce

Preparation

  1. Preheat oven to 425°F.
  2. Rub roast with olive oil, salt, pepper and garlic powder and place on rack in a shallow roasting pan.
  3. Bake uncovered for 45 minutes to 1 hour or until thermometer reads 130°F.
  4. Rest the roast for approximately 20-30 minutes by placing it in another dish and cover with foil while you make the au jus.
  5. Skim off excess fat from the roasting pan.
  6. Heat roasting pan with 1 cup of beef broth and scrape the bits from the bottom of the pan. Set aside.
  7. Heat small pot with olive oil.
  8. Sauté onions until softened, then add garlic.
  9. Add beef broth from the roasting pan and the remaining 2 cups of beef broth and Worcestershire sauce. Bring it to a boil and set aside.
  10. Carve beef.
  11. Cut the kaiser bun in half and lightly dip the inside of the top and bottom bun.
  12. Make a sandwich by placing the sliced beef in the bun.

Notes

Note #1: Make sure you take the roast out of the refrigerator and leave to sit at room temperature for 1 hour.

Note #2: You can have the au jus as a dipping sauce on the side if desired.

https://www.memorabledishes.com/beef-on-a-kaiser/

Macaroni Soup with Ham

Macaroni Soup with Ham

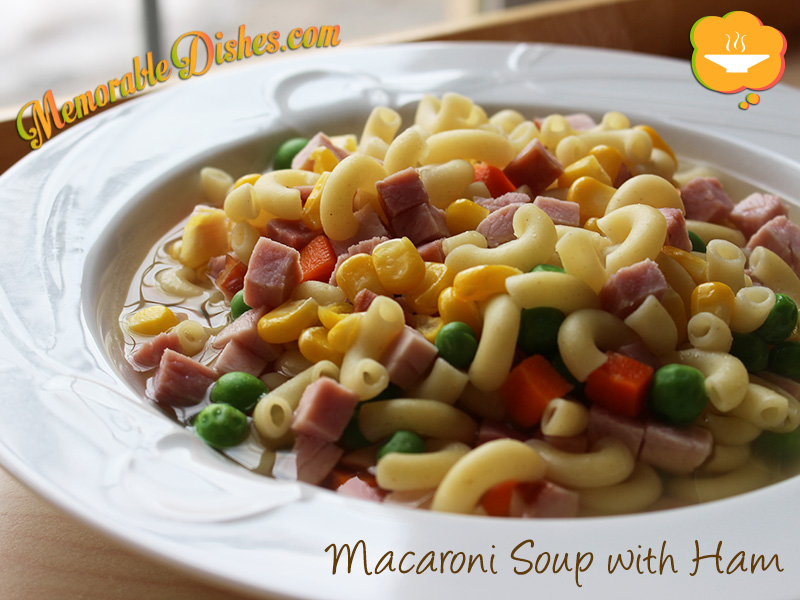
I love Macaroni Soup. My mom used to make it for us when we were kids. I don’t quite recall but I think she used to make it specifically when we were sick. But it was definitely a favourite childhood Memorable Dish of mine. I used to suck on the macaroni tube when it was in my mouth to drink the soup that was trapped in there. What am I saying? I still do it now! I just remember having a lot of fun eating it.

I did a little research and have come to realize that this is a Hong Kong-Western style dish! I thought everyone grew up eating this. In Hong Kong, Macaroni soup with ham is usually eaten for breakfast or lunch. When my kids are sick, the first thing I think of making them is macaroni soup. It’s easy to make, brothy, warm and so yummy to eat.

This is a great alternative to macaroni cheese and a great dish to make for the kiddies. It covers all the basic food groups – carbs, proteins and veggies. I’m sure this Memorable Dish will please children anywhere!

It’s super easy to make when you have everything on hand. It makes a great one-dish meal for children and adults alike. Have this Memorable Dish for breakfast and pretend you are at a Hong Kong-Western style café!

Macaroni Soup with Ham

Macaroni Soup with Ham

Prep Time: 10 minutes

Cook Time: 10 minutes

Total Time: 20 minutes

Serving Size: 1

Ingredients

  • 1 cup of cooked Macaroni pasta
  • 1/2 cup diced Ham
  • 1/2 cup frozen Corn, Peas, Carrot mix (defrosted)
  • 2 cups Chicken Broth (Homemade or your favourite store-bought brand)
  • Splash of Vegetable Oil
  • Salt and White Pepper to taste

Preparation

  1. Prepare macaroni pasta according to package instructions.
  2. Drain macaroni in colander, add vegetable oil and mix to prevent from sticking.
  3. Bring the chicken broth to a boil and add macaroni, ham, and vegetables.
  4. Once the broth boils again, it’s ready to serve.
https://www.memorabledishes.com/macaroni-soup-with-ham/

Show Buttons
Hide Buttons