Category Archives: Pork

Recipes of Pork

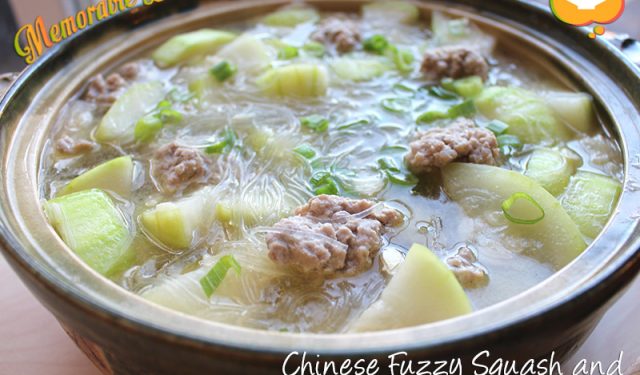
Chinese Fuzzy Squash and Pork Meatballs Stew

Chinese Fuzzy Squash and Pork Meatballs Stew

As an inexperienced gardener/farmer, last year I planted zucchinis that happened to overtake my small garden box. This year it was the Chinese fuzzy squash that took over the box. I didn’t get a chance to buy anything to plant and yet my garden box was full of crops. Between my father and my father-in-law, they bought me seedlings of tomatoes, cherry tomatoes, cucumbers, basil (which were in separate planters), peppers and Chinese fuzzy squash. I even had a sunflower growing in that box (don’t ask me how it got there.)

In that garden box, I got a few cucumbers, a few tomatoes, a fair amount of cherry tomatoes but the peppers never grew. However, the fuzzy squashes just keep on giving. My husband recently picked two ginormous squashes because I could never find them hidden underneath the big leaves. He even said there’s another small one growing right now (thanks to our mild weather this fall).

This Memorable Dish is one of my favourite childhood dishes. I remember my mom making it quite a bit. This dish is great for the kiddies because it’s brothy, noodle-ly and made with meatballs. What kid doesn’t love meatballs! Although they’re not too crazy about the squash part of the stew, they hesitantly eat it due to my daily propaganda of the importance of eating vegetables. This Chinese fuzzy squash and pork meatballs stew definitely brings me back warm, fuzzy and cozy memories 🙂 .Chinese Fuzzy Squash and Pork Meatballs Stew
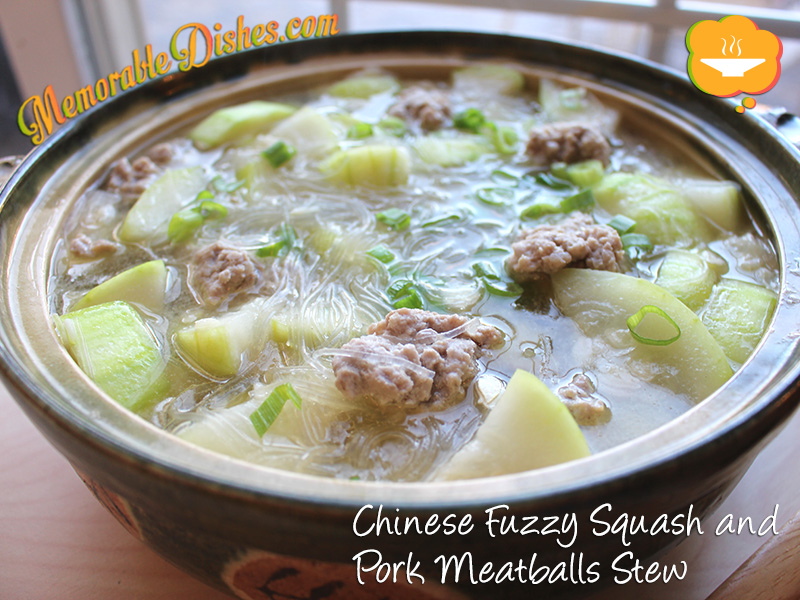
Chinese Fuzzy Squash and Pork Meatballs Stew

Prep Time: 20 minutes

Cook Time: 20 minutes

Total Time: 40 minutes

Serving Size: 4-6

Ingredients

  • 1 1/2 pounds of Ground Pork
  • 1 tbsp of Soy Sauce
  • 1/2 tsp of Salt
  • 1/2 tsp of Sugar
  • 1 tsp of Cornstarch
  • 1/8 tsp of White Pepper
  • 1 tsp of Sesame Oil
  • 2 slices of Ginger
  • 1 Fuzzy Squash, cut into 2-inch, length-wise chunks
  • 2 cups Cellophane Noodles
  • 4 cups of Chicken Broth (add more if needed)
  • 1 tbsp of Oil
  • 1 sliced Green Onion for garnish

Preparation

  1. Marinate pork with soy sauce, salt, sugar, cornstarch, white pepper, sesame oil for at least 30 minutes.
  2. Reconstitute the dry cellophane noodles by soaking them in cold water.
  3. Shape pork into golfball sized meatballs or smaller and set aside.
  4. Heat 1 tbsp of oil in a large pot. Once the pot is heated, put 2 slices of ginger and stir fry along with the fuzzy squash for a bit until you get a bit of colour.
  5. Add the chicken broth and once it’s brought to a boil, slowly add the pork meatballs one by one.
  6. Cover and lower heat once the broth boils again.
  7. Cook for approximately 10 minutes until fuzzy squash is tender.
  8. Bring heat back up again and put cellophane noodles in the broth.
  9. Once it’s boiled again, turn heat off and garnish with green onions.

Notes

I cook my stew in a Chinese ceramic pot that is great for moving from stove to table 🙂 .

https://www.memorabledishes.com/chinese-fuzzy-squash-and-pork-meatballs-stew/

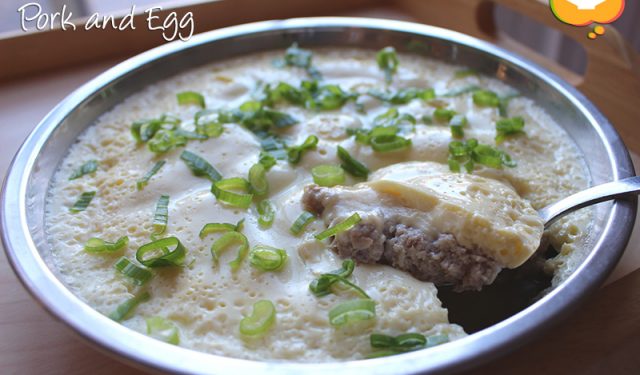
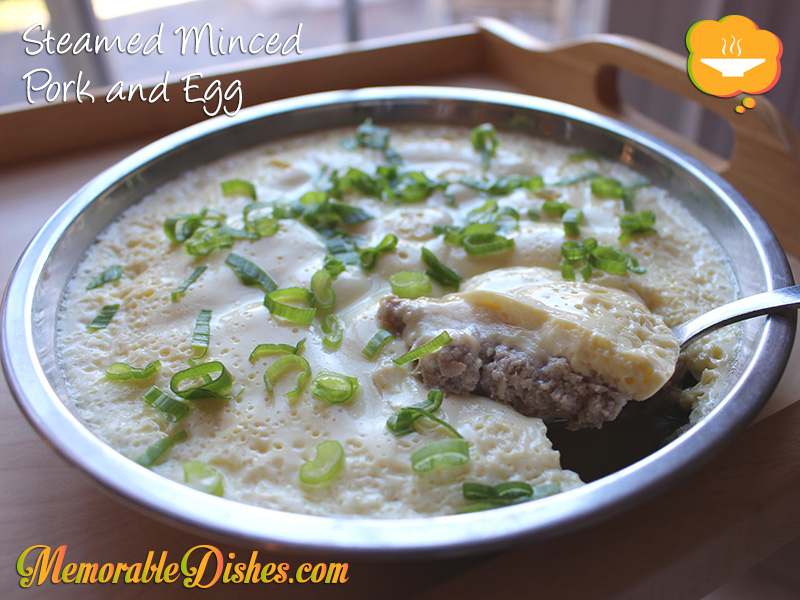
Steamed Minced Pork and Egg

Steamed Minced Pork and Egg

Sometimes the most simplest food gets overlooked. I can’t believe I didn’t write a blog post about this Memorable Dish sooner! Steamed minced pork and egg was a childhood staple for me. I used to and still love eating this simple dish mixed with rice.

Growing up in Hong Kong, I remember eating this dish quite a bit. Even after moving to Canada and the United States, my mother continued making it for us. It uses simple ingredients that you can find anywhere so the comfort of this childhood dish can be made in a pinch.

Our family loves this Memorable Dish with the exception of my oldest son. He likes the pork but doesn’t like the custardy egg. He thinks it’s tofu (which he doesn’t like). I would say most kids love it though because of its silky egg. Every time I have this dish it reminds me of being a little girl gobbling it with rice.Steamed Minced Pork and Egg

Steamed Minced Pork and Egg

Prep Time: 10 minutes

Cook Time: 10 minutes

Total Time: 20 minutes

Serving Size: 4

Ingredients

  • 1/2 pound of Ground Pork
  • 1 tsp of Soy Sauce
  • 1/2 tsp of Cornstarch
  • 1/4 tsp of Sugar
  • 1/2 tsp Shaoxing Wine or Cooking Wine
  • Dash of White Pepper
  • 3 large Eggs
  • 3/4 cup Chicken Broth
  • 1/8 tsp Salt
  • Green Onions, sliced, for garnish

Preparation

  1. Marinate ground pork with soy sauce, cornstarch, sugar, shaoxing wine, and white pepper for at least 30 minutes.
  2. In a stainless steel or ceramic wide and shallow dish, spread the ground pork mixture on the bottom of the dish as thin as possible.
  3. In a small bowl, beat the eggs, chicken broth and salt.
  4. Pour egg mixture on top of the ground pork.
  5. Steam for 8-10 minutes after the water has boiled.
  6. Garnish with sliced green onions.
https://www.memorabledishes.com/steamed-minced-pork-and-egg/

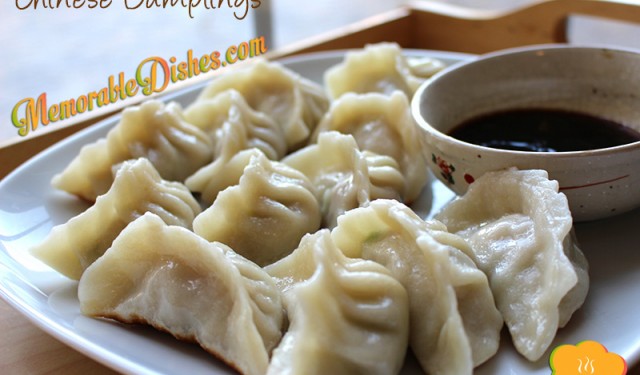
Chinese Dumplings

Chinese Dumplings

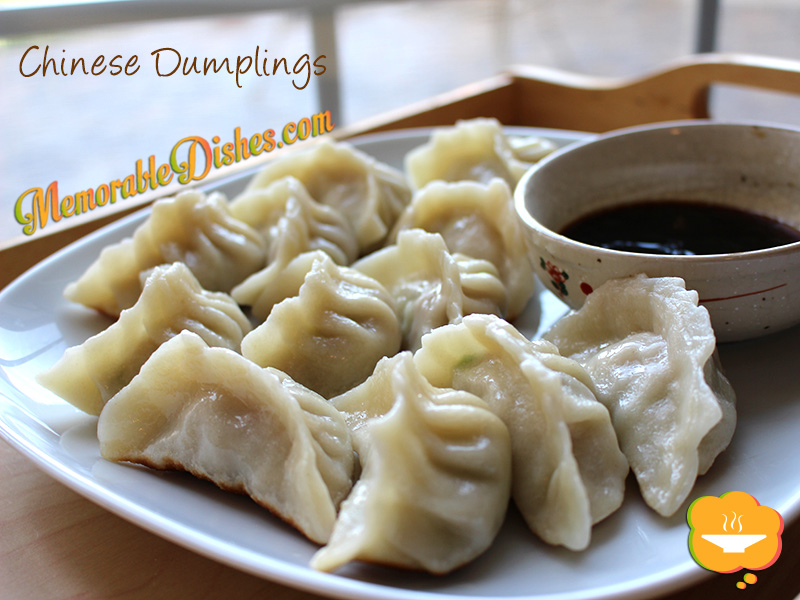
As a child I remember going to my maternal grandmother’s house on Sundays to wrap Chinese dumplings. As southern Chinese people, we don’t usually eat a lot of dumplings and are not very skillful in making the dough from scratch. So I can’t quite understand why we make dumplings on a fairly regular basis. My mother says it’s because my maternal grandfather’s friend (who we call great uncle) is an expert dumpling maker who used to own a dumpling shop. What a treat for me as a child! To witness my great uncle transforming flour and water into dough and then into dumpling wrappers was like magic.

Northern Chinese are known for their expertise in dumpling making. As southerners, we are not, hence we recruit other family members for the task to make the process go faster. Plus, it’s a great social event and gives us a chance to talk and bond. It’s like spending quality time and making something delicious to eat at once—a two for one deal!

While I was making these dumplings, my boys were eager to help. (I think they just wanted to play with the dough 😉 .) I told them they could help next time. My mother and I were making very “slow progress”, as quoted by my second son, and any interference would make the process even slower. We are not skillful dumpling makers but I must say I am looking forward to making this Memorable Dish again soon. The more I make it, the better I will become and in no time I will be as fast as the dumpling makers I see at the Chinese dumpling shops! (Yeah right! But I can’t wait to make it again soon. I’ll see how long the boys will last and see if they will actually finish making the dumplings from start to finish 🙂 .)

Chinese Dumplings

Chinese Dumplings

Chinese Dumplings

36 dumplings

Ingredients

  • Dumpling Dough
  • 2 cups All Purpose Flour
  • 1 cup Boiling Water
  • Filling
  • 2 cups Napa Cabbage, julienne
  • 3 tsp Salt (2 tsp for cabbage and 1 for pork)
  • 1 pound Lean Ground Pork
  • 1/4 cup Green Onions, thinly sliced
  • 1 tbsp grated Ginger
  • 1 tbsp minced Garlic
  • 1 tbsp Chinese Cooking Wine
  • 1 tsp Cornstarch
  • 1 tsp Sesame Oil
  • 1/8 tsp White Pepper
  • Dipping Sauce
  • 2 tbsp Soy Sauce
  • 2 tbsp Vinegar
  • 1 tsp Sesame Oil
  • Water for boiling dumplings
  • 1 1/2 tbsp Vegetable Oil

Preparation

  1. In a medium bowl, mix 2 teaspoons of salt into the napa cabbage. Set aside for 5 minutes and squeeze out the excess moisture with a paper towel.
  2. In a large bowl, mix the napa cabbage, pork, green onions, ginger, garlic, wine, cornstarch, sesame oil, white pepper and the remaining 1 teaspoon salt. Set aside.
  3. In a large bowl, mix the flour and 1 cup of boiling water together. Mix until a soft dough forms. Knead the dough on a lightly floured surface until smooth, about 5 minutes.
  4. Divide the dough in half and shape each into a roll approximately 12 inches long. Cut each roll into half inch slices.
  5. Roll 1 slice of dough into a 3-inch circle. The dough shouldn’t be too thin nor too thick.
  6. Place 1 tablespoon of pork mixture in the center of the circle.
  7. Lift up the edges of the circle and pinch into pleats to create a pouch. Pinch the top together. Repeat with the remaining slices of dough and filling.
  8. Heat a large pot with water. Once the water is boiled, put approximately 12 dumplings at a time to boil.
  9. Once the dumplings float to the top, boil for another 2 minutes. Drain and set aside.
  10. Heat a nonstick wok or skillet until very hot. Add 1/2 tablespoon vegetable oil
  11. Place 12 dumplings in a single layer in the wok and fry 1-2 minutes, or until the bottoms are golden brown.
  12. For the dipping sauce, mix the soy sauce, vinegar and 1 teaspoon of sesame oil in a small bowl. Serve with the dumplings.

Notes

Note #1: You can make and store extra dumplings by freezing them on a tray lined with parchment paper. Put them into bags after they’re frozen. You don’t need to defrost them when boiling. Just boil them a little longer since they are frozen.

Note #2: If you cannot enclose the dumplings by creating pleats mentioned above, just pinch the dumplings tightly closed so the filling doesn’t leak out.

https://www.memorabledishes.com/chinese-dumplings/

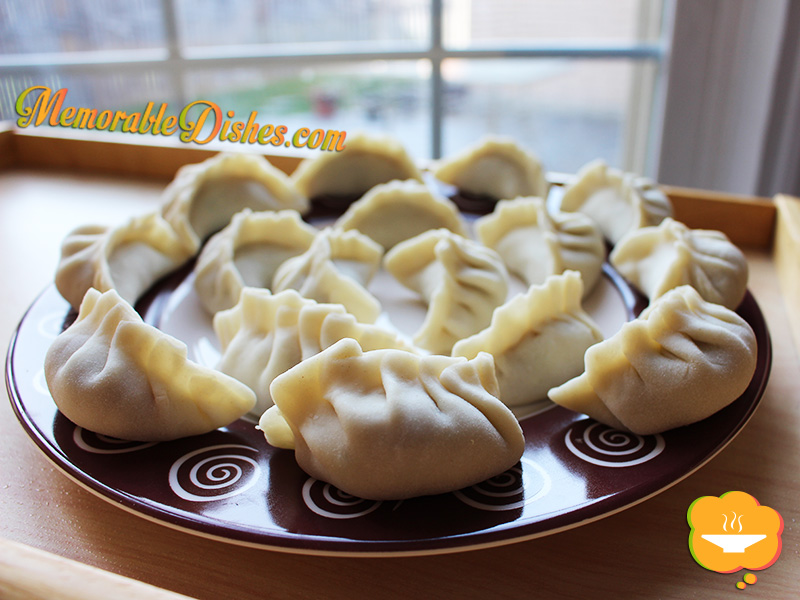
Chinese Dumplings - Raw

Chinese Dumplings (Raw) – You can see my amateur skill at pleating the dough 🙂

Potato Sausage Bake

Potato Sausage Bake

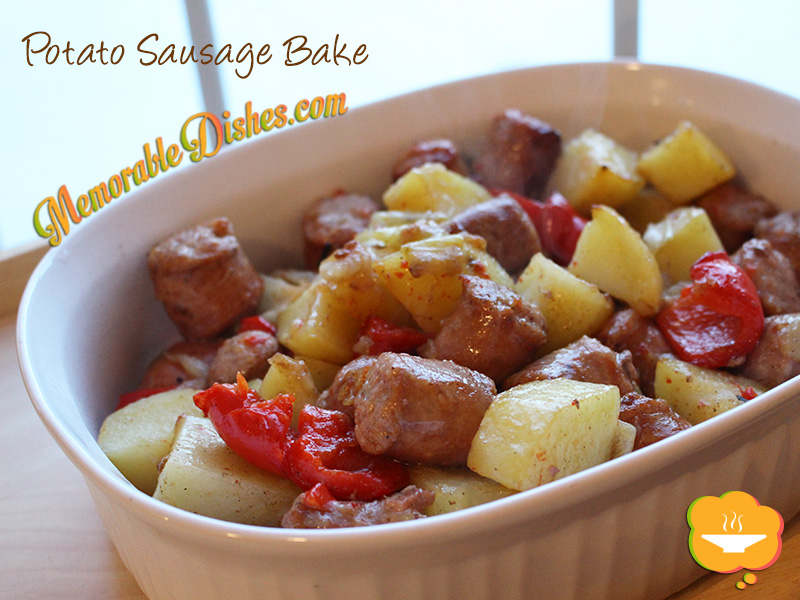
This is one of those dishes that I came up with on the fly because of what I had on hand. Often I make dishes from things I find in the fridge and not with the intention of making anything great. More often than not, my husband would say, “This is so good! Remember it for next time!” I tell him it’s nothing special and I’m sure I’ll remember it next time. I also like to challenge myself to come up with recipes in a pinch so I don’t write it down for that very purpose! 😛

One of the things I learned from one of my cooking class teachers about baking food (not baking sweets) is you can bake at a higher temperature if you’re short on time. One of the students asked the chef how long we should bake a dish for. The chef answered, “it depends on how much time you have. If you have more time, you can use the standard 350 degrees and if you have less time, put the temperature higher to speed up the process. Just watch the oven”. I never thought of that. When I read a recipe for baking food, I always follow the temperature precisely. When I cook on the stove, I adjust the temperature throughout to speed up the process. So it makes sense that you can do it for baking food as well. It is great advice from my teacher and I hear her voice assisting me every time I bake something savoury.

This experimental Memorable Dish is a quick one-dish dinner that could be made fairly quickly. It’s perfect for a weeknight dinner. I made this dish at 350 degrees for an hour the first time and this time, I baked it at 400 degrees for a shorter time. I kept an eye on it and it turned out great both times. I hope you try to experiment making different dishes with whatever food you have on hand. Please share and let me know how your experimental dish turns out 🙂

Potato Sausage Bake

Potato Sausage Bake

Prep Time: 15 minutes

Cook Time: 45 minutes

Total Time: 1 hour

Serving Size: 4

Ingredients

  • 3 medium Potatoes, large cubes
  • 1 medium Onion, large dice
  • 1 Red Pepper, large
  • 1/2 tsp Salt
  • 1/4 tsp Black Pepper
  • 1 tbsp Olive Oil
  • 4 pieces of your favourite Sausages, cut into 1-inch pieces

Preparation

  1. Preheat oven to 400°F
  2. Place and mix all the vegetables, salt, pepper and oil in a large baking dish.
  3. Put the cut up sausages with the vegetables and mix.
  4. Bake for 30-45 minutes until slightly brown. Mix the sausages and vegetables halfway.
  5. Depending on how big you cut your vegetables and sausages, it can take longer or shorter to bake.
https://www.memorabledishes.com/potato-sausage-bake/

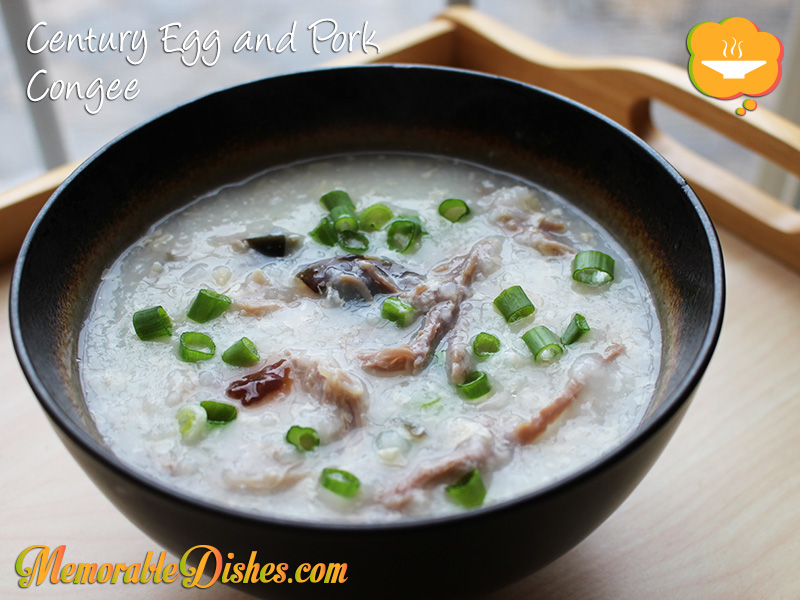
Century Egg and Pork Congee
(皮蛋瘦肉粥)

Century Egg and Pork Congee

Congee is a comfort food that many Asians grew up eating. It’s a rice porridge that is typically served for breakfast or lunch if you accompany it with other heartier foods such as noodles. You’ll get full pretty fast if you’re eating congee but you’ll get hungry pretty soon too because it’s liquidy. It’s also a great meal to eat when you’re feeling sick because it’s warm and nourishing. Congee is like North American’s chicken soup.

I’m sure a lot of Chinese children grew up eating this Memorable Dish whether they grew up in Asia, North America or any other part of the world. If they are able to buy century eggs, their moms or grandmothers would’ve made them this congee when they were children.

My mother uses a couple of Chinese ingredients that may not be common to some. So if you can’t find them or don’t want to use them, it’s OK. One ingredient is conpoy (dried scallop) because it gives the congee a better taste. You won’t find good quality conpoy at your Chinese grocery store. We usually buy it from a Chinese dried seafood shop (海味店). She also mixes dried bean curd sheet (腐竹) with the rice before boiling it.

At first, my boys didn’t seem to like congee very much. Every time we had it at my mom’s house, they would only eat a few spoonfuls. They ate more of the side dishes of noodles and Chinese cruller. For them, congee equates Chinese cruller; congee is blasphemous without it. As time goes by, they started getting second bowls of congee! I wonder if it’s because of the crunchy Chinese cruller they love dipping the congee into or their taste suddenly evolved into a higher level of adult sophistication.

I’m sure this Memorable Dish brings back childhood memories for a lot of Chinese families. I remember my grandmother making it for us when we were kids and now my mother makes it for us and my kids. When my kids grow up I will teach them how to make this dish for their family with the hopes that they will continue the tradition of congee cooking for their loved ones.Century Egg and Pork Congee

Century Egg and Pork Congee
(皮蛋瘦肉粥)

Prep Time: 15 minutes

Cook Time: 1 hour

Total Time: 1 hour, 15 minutes

Serving Size: 6-8

Ingredients

  • 1 pound Lean Pork, cut into 2 big pieces
  • 2 tsp Salt
  • 1 Century Egg (cut in half)
  • 1 cup Rice
  • 2 slices of Ginger
  • 16 cups Water
  • 3 pieces of Conpoy (Dried Scallop) (optional)
  • 1/2 cup Dried Bean Curd Sheet, crushed up (optional)
  • 1 sliced Green Onion for garnish
  • White Pepper & Salt or Soy Sauce to taste

Preparation

  1. The night before, coat pork pieces with salt and marinate in the fridge.
  2. If using conpoy, soak them in water to reconstitute it.
  3. On the day of making the congee, rinse rice until the water is almost clear.
  4. In a large bowl, mix 1/2 century egg, rice and dried bean curd sheet (if using) together. Set aside.
  5. After conpoy has been softened, break pieces up with a fork or by hand.
  6. In a large pot, put 12 cups of water, pork pieces, ginger slices, and conpoy (if using). Bring everything to a boil.
  7. Once it’s boiled, skim off scum and boil for another 15 minutes.
  8. Put rice mixture into the boiling liquid and once it’s boiled, turn down to medium to medium high heat.
  9. The liquid should be in a rolling boil state.
  10. Keep the pot lid slightly open so the congee won’t boil over,
  11. Cook congee for 15 minutes and add the additional 4 cups of water.
  12. Cook congee for approximately 45 minutes more.
  13. Check and stir the pot periodically to make sure the rice doesn’t stick to the bottom as it thickens.
  14. Once you boil it to the consistency of your liking, the rice should be broken down by now. Turn off heat.
  15. Take the big pork pieces out of the pot and shred it with a fork or by hand.
  16. Cut the other half of the century egg into small pieces.
  17. Put the shredded pork and century egg back into the pot of congee and mix.
  18. Serve in bowls and garnish with green onions, white pepper and salt or soy sauce to taste.

Notes

If you like thicker congee, cook it longer. If you like it thinner, add a bit more water. Make sure you bring it back to a boil if using cold water.

https://www.memorabledishes.com/century-egg-and-pork-congee/

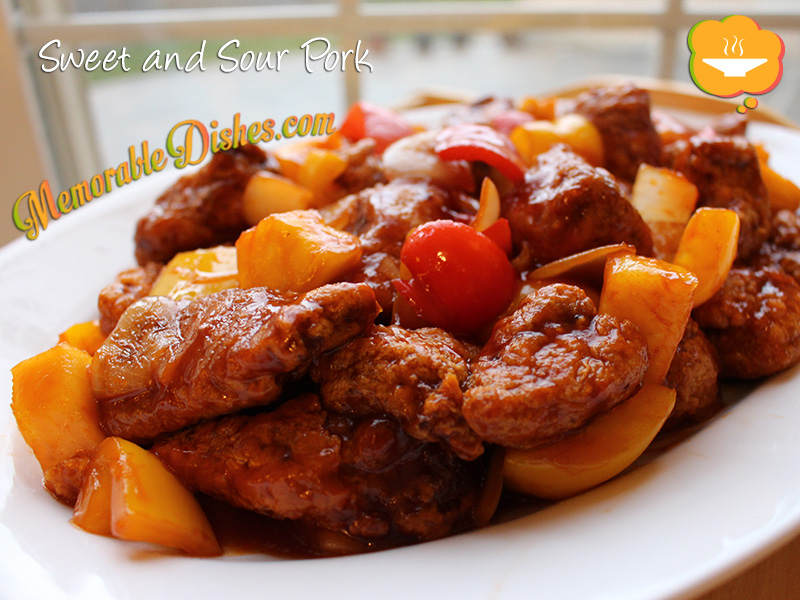
Sweet & Sour Pork

Sweet & Sour Pork

This Memorable Dish is another tribute to my husband. He loves sweet and sour pork. I would think most North Americans who eat Chinese food know about this dish and usually love it.

Believe it or not, this is NOT one of those dishes that was invented by North American Chinese, like chop suey. I believe sweet and sour pork is one of the most well known dishes in Chinese cuisine, both American/Canadian-Chinese and authentic Chinese restaurants alike.

My mom usually makes this for Sunday dinner when she has a bit more time because it’s a two-step process. First you have to deep fry the pork and then stir fry it with the sweet and sour sauce. I always find it a bit cumbersome to deep fry stuff at home. But alas, my mom does it because she enjoys making the food we like to eat.

This version of sweet and sour pork is based on my mom’s homemade version. Every Chinese family has their take on this dish and only certain Chinese restaurants make it well. Try my version but don’t forget to adjust the sweetness or sourness to your family’s liking.Sweet & Sour Pork

Sweet & Sour Pork

Prep Time: 20 minutes

Cook Time: 20 minutes

Total Time: 40 minutes

Serving Size: 4-6

Ingredients

  • 1 1/2 lbs Pork Butt (Shoulder), cut into 1 inch cubes
  • 1 tbsp of Soy Sauce
  • 1 tsp of Sugar
  • 1 tsp of Cornstarch
  • 1 tsp Shaoxing Wine or Cooking Wine
  • 1 small Onion, cut into large dice
  • 1 Pepper (green, red, orange or yellow), 1 inch pieces
  • 1 cup fresh or canned Pineapple,1 inch cube
  • 1/2 cup Ketchup
  • 1/2 cup Apple Cider Vinegar
  • 3 tbsp Sugar
  • 1 tbsp Soy Sauce
  • 1 Egg, beaten
  • 3/4 cup Cornstarch
  • Vegetable Oil for deep frying

Preparation

  1. Marinate pork with soy sauce, sugar, cornstarch, and cooking wine for at least 1 hour.
  2. In a small bowl, mix ketchup, vinegar, soy sauce and set aside.
  3. Preheat oil in a deep fryer or deep skillet to 375°F.
  4. Mix beaten egg with the marinated pork.
  5. Coat pork in cornstarch and shake off excess.
  6. Deep fry the pork until golden brown for about 5 minutes or until it floats.
  7. Make sure you don’t overcrowd the pork. Fry in batches if you’re not using a deep fryer with lots of oil.
  8. Once the pork pieces are done, place them on a plate lined with paper towel to absorb excess oil.
  9. In a wok or large skillet, heat up 1 tbsp of oil.
  10. Fry onions and green peppers until softened, then add ketchup mixture sauce.
  11. Once the sauce starts to boil, add the pineapples and stir.
  12. Put the pork in and mix until everything is coated.

Notes

Taste the ketchup mixture after you mix it. You might want to adjust the sweetness or sourness to your taste.

https://www.memorabledishes.com/sweet-sour-pork/

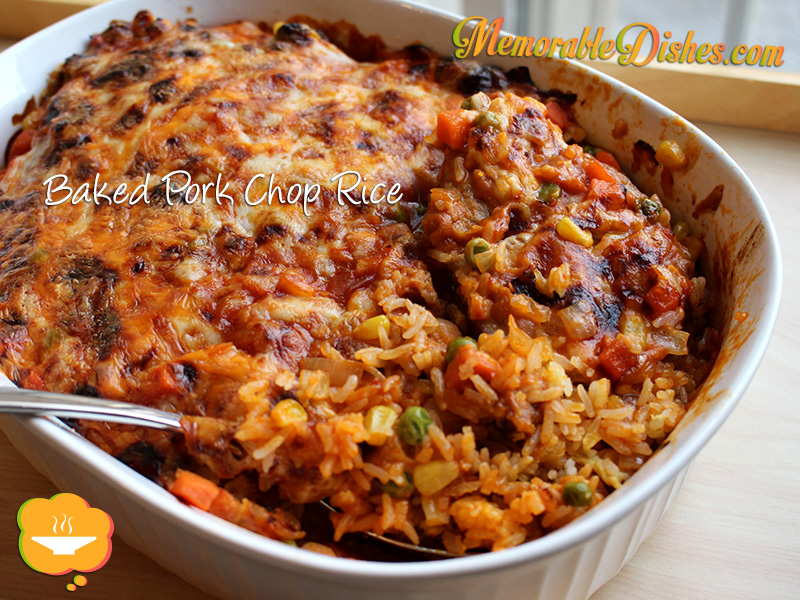
Baked Pork Chop Rice – Hong Kong Style (焗豬扒飯)

Baked Pork Chop Rice

Baked Pork Chop Rice is a much enjoyed and popular dish at Hong Kong-Western style cafés. Until recently, I didn’t know what sauce the cafés used for their baked pork chop rice. Somehow I never questioned where the smooth and pasty tomato sauce that adheres to the top of the pork chops came from. It could be béchamel sauce with tomato paste mixed in? The tomato sauce definitely doesn’t taste like the familiar tomato sauce that goes on top of Italian meatballs. I thought about it for a bit but never gave it much more thought.

Somehow when I was perusing down the canned soup aisle…eureka—canned tomato soup! Yes, food thoughts pop into my head when I least expect it. How could I not have figured this out? Based on the taste, texture and colour, they must use canned tomato soup as their sauce! Don’t quote me on it, the cafés might very well make their sauce from scratch and use their special secret ingredients. But I figure to make this Memorable Dish at home, it’s a great and easy alternative to use canned tomato soup.

This comfort food is enjoyed by many Hong Kongers. Eating out in Hong Kong is the norm because everyone is super busy and food is readily available everywhere. Some cafés deep-fry their pork chops but this homemade version is pan-fried. At the restaurants, they usually use egg fried rice as the base. If it’s too much hassle, just use plain steamed rice. Our kids really enjoyed this Memorable Dish at our home Hong Kong-Western style café! I just have to make a Yinyeung (Hong Kong style coffee and tea) to go with it next time 😉

Baked Pork Chop Rice

Baked Pork Chop Rice – Hong Kong Style (焗豬扒飯)

Prep Time: 20 minutes

Cook Time: 30 minutes

Total Time: 50 minutes

Serving Size: 4

Ingredients

  • 4 pieces of Pork Loin
  • 1 tbsp Soy Sauce
  • 1 tsp Sugar
  • 1 tsp Cornstarch
  • 1 tsp Chinese Cooking Wine (optional)
  • 1/8 tsp White Pepper
  • 1/4 cup Flour
  • Vegetable Oil (enough to cover your pan 1/4 inch deep)
  • 2 cloves minced Garlic
  • 1 small Onion, diced
  • 1 can of Tomato soup
  • 1-2 cups of frozen Peas, Carrots, Corn (thawed)
  • 5 cups cooked Egg Fried Rice or Plain Rice
  • 1/2 cup Mozzarella Cheese, grated
  • 1/2 cup Cheddar Cheese, grated

Preparation

  1. Use a meat tenderizer or the back of a cleaver to tenderize the pork chops.
  2. Marinate pork chops with soy sauce, sugar, cornstarch, cooking wine and white pepper for at least 30 minutes.
  3. Preheat oven to 400°F before frying pork chops.
  4. Lightly flour both sides of the pork chops.
  5. Heat oil and fry pork chops on each side until brown. Set aside.
  6. Drain all the oil except for 1 tablespoon left in the pan.
  7. Sauté onions for a few minutes then add the garlic.
  8. Pour the can of tomato soup into the onions and use a bit of water to rinse out the rest of the soup in the can.
  9. Mix the vegetables into the sauce and turn off heat.
  10. In a glass or ceramic dish, put rice at the bottom, then the pork chops and then top with the tomato sauce.
  11. Sprinkle with cheese and bake for 20 to 30 minutes depending on how thick your pork chops are.
  12. If your cheese is not brown enough, you can put it under the broiler for a few minutes.

Notes

Make sure the oil is hot before frying pork chops. To test if the oil is hot enough, sprinkle a little flour in it. If it sizzles, then it’s hot enough.

https://www.memorabledishes.com/baked-pork-chop-rice/

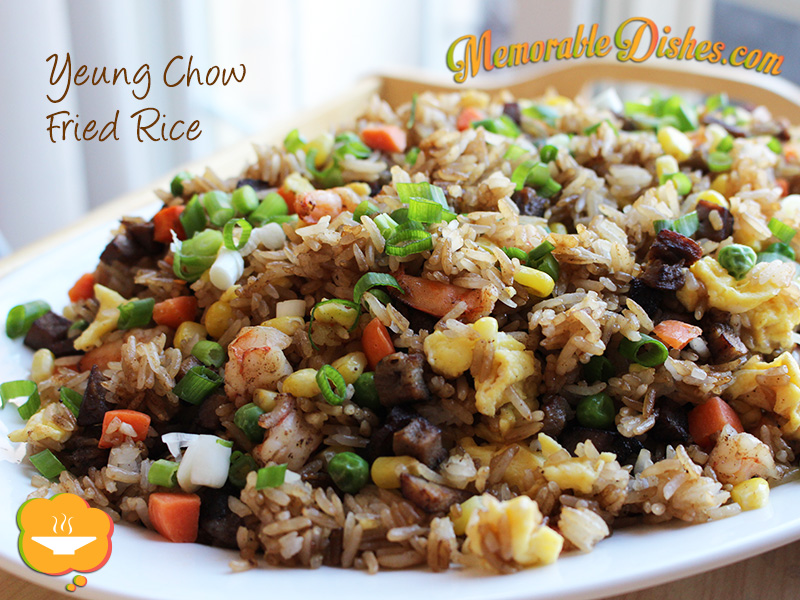
Yeung Chow Fried Rice (揚州炒飯)

Yeung Chow Fried Rice

Yeung Chow Fried Rice derives from the city of Yangzhou, Jiangsu province of China. I believe it’s one of the most popular Cantonese rice dish in the West. In every Chinese restaurant, there is Yeung Chow Fried Rice on the menu. Who wouldn’t love it? It has a taste of everything—bbq pork, shrimp, eggs and veggies.

If you ask my husband what his favourite Chinese food is he would definitely say, “Yeung Chow Fried Rice!” Every time we go to a Chinese restaurant, he wants to order Yeung Chow Fried Rice. When he heard that I was making this for the blog, he was disappointed that he wouldn’t be able to taste this Memorable Dish because he had to fly out for work. I told him I was going to save him some if the boys hadn’t devoured it all.

The kiddies also love Yeung Chow Fried Rice. Actually they love eating any type of fried rice. I think the crispiness of the rice combined with the meat and vegetables give their mouths a sensation overload that they enjoy. They can eat bowls and bowls of it! When they eat fried rice, they are like little machines scooping big mouthfuls at a time into their mouths.

You can easily make this Memorable Dish right in your own home. Either buy Chinese BBQ Pork from the Chinese BBQ shop or major Chinese grocery store. If you have time, make your own Chinese BBQ Pork from my recipe. Frankly, I think it tastes better when you make this fried rice at home. I find that restaurants skimp out on the ingredients and the meat to rice ratio is too low. I’ll bet you can’t just eat one bowl of this yummy fried rice 😉Yeung Chow Fried Rice

Yeung Chow Fried Rice (揚州炒飯)

Prep Time: 15 minutes

Cook Time: 15 minutes

Total Time: 30 minutes

Serving Size: 4

Ingredients

  • 5 cups of day-old Cooked Rice (2 cups of uncooked rice)
  • 2 cups of Chinese BBQ Pork (Char Siu), diced
  • 1/2 cup of Shrimp, diced
  • 2 cups of frozen Peas, Carrots, Corn (thawed)
  • 3 large beaten Eggs
  • Vegetable Oil (1 tsp for eggs, 1 tsp for bbq pork and shrimp, 3 tsp for rice)
  • 1/2 tsp Salt
  • 1 tsp Garlic Powder
  • 1/4 cup low sodium Soy Sauce
  • 1 sliced Green Onion for garnish

Preparation

  1. Heat 1 tsp of oil in a non-stick wok or large frying pan.
  2. Scramble the eggs and set aside.
  3. Using the same wok, heat 1 tsp of oil and fry up the bbq pork until it’s lightly brown. Then add the shrimp to the pork and cook until shrimp just turn pink. Set aside.
  4. Heat 3 tsp of oil and stir fry the rice until it’s heated through.
  5. When the rice turns a bit crispy, add the salt, garlic powder, and soy sauce.
  6. Stir fry the rice a bit more until the soy sauce is mixed in the rice.
  7. Put the pork, shrimp, eggs, and vegetables with the rice.
  8. Stir fry all the ingredients until they are evenly mixed.
  9. Garnish with sliced green onions.

Notes

If you don’t have any day-old rice, cook the rice and cool it in the fridge before making the fried rice for best results. Basically, the rice has to be a bit on the dryer side.

https://www.memorabledishes.com/yeung-chow-fried-rice/

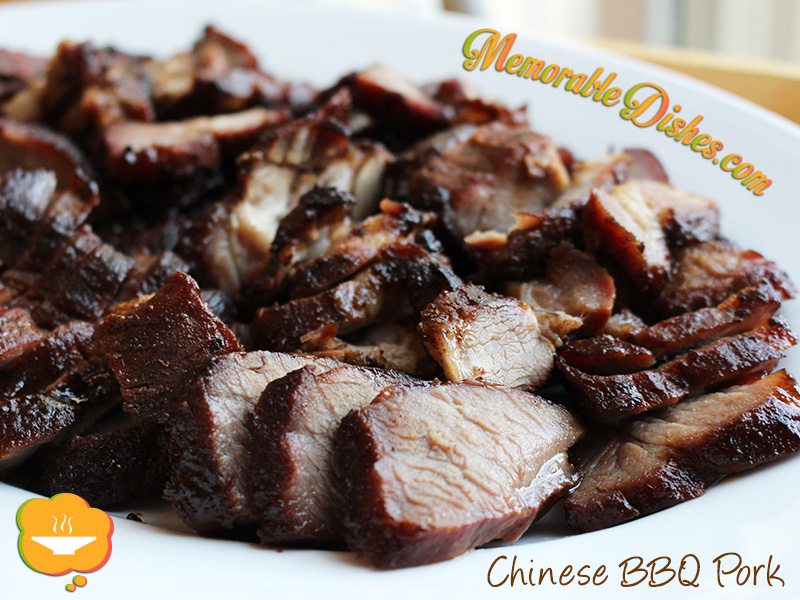
Chinese BBQ Pork (Char Siu)

Chinese BBQ Pork

One of the most comforting foods to eat is Chinese barbecue with steamed rice. Roasted Peking duck, Chinese crispy pork, and of course, Chinese BBQ pork. If you live in areas where Chinese BBQ shops are readily available, you’re in for a treat. The BBQ shops hang whole pigs, ducks, chickens, squid, and sausages. They also sell other animal parts that might be tasty to some, but to others, maybe not so yum. I find all Chinese BBQ foods delicious nonetheless :d

My mom makes homemade Chinese BBQ pork at home often. She got the original recipe from my uncle who is a professional chef. In the recipe, the ingredient amount is very high because it is used for restaurants. Also, it uses Chinese units of measurement and a hassle to translate to our measurements. For example, it would say one Chinese pound of hoisin sauce or something like that. So my mom translates one Chinese pound to one tablespoon for home use.

I concocted this Memorable Dish based on my uncle’s recipe and others that I found. I also altered it a bit to suit my own taste. It is fairly easy to make once you find all the sauces at your local Asian supermarket. Even though this is comfort food for me, it can also be a great dish to make for a dinner party or potluck. When people ask if you bought it from the Chinese barbecue shop, you can proudly tell them it’s from your own home bbq shop! Maybe you can even trick them by putting it in a takeout container 😉Chinese BBQ Pork

Chinese BBQ Pork (Char Siu)

Prep Time: 10 minutes

Cook Time: 1 hour

Total Time: 1 hour, 10 minutes

Serving Size: 4-6

Ingredients

  • 2 lbs Pork Butt (Shoulder)
  • 1/2 cup Soy Sauce
  • 2 tbsp Hoisin Sauce
  • 1 tbsp Ground Bean Sauce (磨豉醬)
  • 1 tbsp Chinese Sesame Paste
  • 1 tbsp Shaoxing Wine or Cooking Wine
  • 1 tsp Five Spice Powder
  • 1 tbsp Sugar
  • 3 tbsp Honey

Preparation

  1. Cut pork into 3 to 4 long pieces.
  2. Mix all the marinate ingredients with a whisk in a large bowl and marinate pork for at least 4 hours or overnight.
  3. Preheat oven to 350°F.
  4. Take pork pieces out of marinade and place them on roasting pan to roast.
  5. In the meantime, bring remaining marinade to a boil in a small pot and set aside.
  6. After you roast the pork for 30 minutes, baste and flip the meat.
  7. Roast for another 30 minutes and it should be ready.
  8. If you want to brown the meat a bit, broil the pork for a few minutes. Make sure you keep an eye on it so you don't burn it.
  9. Take it out of the oven and set aside for 5 minutes before cutting into 1/4 inch thick slices.
  10. Use leftover marinade as dipping sauce.
  11. Serve over steamed rice or soup noodles.

Notes

Chinese Sesame Paste is very thick and topped with oil. So when scooping it out of the jar, try not to scoop too much of the oil.

https://www.memorabledishes.com/chinese-bbq-pork/

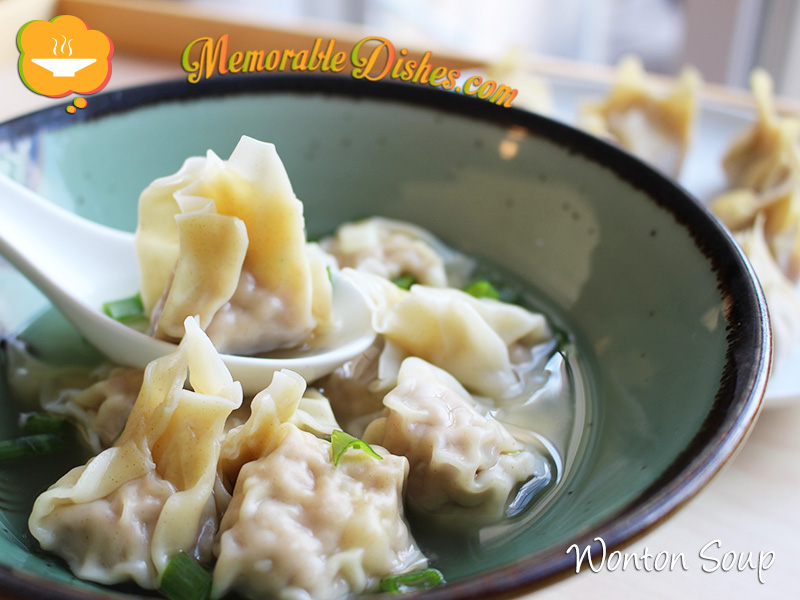
Wonton Soup

Wonton Soup

I believe in most Cantonese Chinese households, girls (and possibly some boys) grow up helping their moms make wontons. I remember making wontons as a kid growing up. I love making wontons! It’s so therapeutic, almost as therapeutic as cleaning squids (or maybe it’s just me 😉

We would sit around the table with a big bowl of meat mixture made up of ground pork and shrimp wrapping away. The inexperienced ones (usually the younger kids) would stuff too much mixture into the wrapper causing the wontons to burst. We always thought there wasn’t enough meat in there. We forgot we still had to close the wrapper after putting the meat in.

If you have witnessed professionals wrapping wontons, it’s like watching a Chinese Speedy Gonzales. You see the beginning and before you know it, it’s finished. Everything in between is a big blur. If there was a video camera to capture this action, it would go something like this (imagine viewing this in slow motion.) Wonton wrapper in hand. The other hand scoops the meat mixture with a knife or chopsticks. Then fast as lightning, smears the meat gingerly onto the wrapper. As soon as the meat mixture leaves the knife or chopsticks, the hand holding the wrapper closes and at the same time pinches the wonton shut.

The people in our family, of course, are not professional wonton wrappers. We would do it at normal speed and sometimes break the wrapper with too much meat or not handling the wrappers delicately enough. It took me about 45 minutes to wrap the whole package of wontons by myself. (You can easily speed up the wonton-wrapping process by recruiting other members of your family or friends.) However, this Memorable Dish tastes so much better than the professional ones because it’s made with love. You can serve wontons by themselves with soup or noodles added.

Wonton Soup

Wonton Soup

Prep Time: 45 minutes

Cook Time: 15 minutes

Total Time: 1 hour

Ingredients

  • 1 pound of Ground Pork
  • 1/2 pound of Shrimp, cut into small pieces
  • 2 tsp of low sodium Soy Sauce
  • 1/2 tsp Salt
  • 1/2 tsp Sugar
  • 1/2 tsp Cornstarch
  • 1/8 tsp White Pepper
  • 1/2 tsp Sesame Oil
  • 1 tbsp Water
  • 1 egg
  • 1 package of Wonton Wrappers (small thin ones)
  • 6 to 8 cups Chicken Broth (if you’re serving noodles with it, you’ll need more)
  • 1-2 stalks of Scallions, diced
  • Small bowl of Water for sealing wontons
  • Water for boiling wontons

Preparation

  1. Mix the ground pork, shrimp, soy sauce, salt, sugar, cornstarch, white pepper, sesame oil, water and egg in a big bowl.
  2. Place a sheet of wonton wrapper on the palm of your hand.
  3. Scoop about 1 teaspoon of meat mixture onto the wrapper.
  4. Lightly wet the edges of the wrapper with a bit of water with your finger.
  5. Close the wonton wrapper by lining up one of the corner to the other, creating a triangle. Then bunch the other corners to the middle creating a small pouch.
  6. Fill your large pot 3/4 full of water and bring it to a boil.
  7. Put the wontons to boil a few batches at a time. Be sure not to overcrowd them.
  8. Once the wontons float to the top (approximately 3 minutes), they are done. Use a slotted spoon and scoop them out. Finish boiling the rest of the wontons. Set aside.
  9. Bring the chicken broth to a boil.
  10. Place the wontons in a bowl and put hot chicken broth on top. Garnish with scallions.
  11. You can also serve the wontons with noodles. Prepare noodles according to package. Place noodles in a bowl, top with wontons. Scoop hot broth over it and garnish with scallions.

Notes

Note #1: Sometimes the wrappers stick together, be careful not to tear them.

Note #2: You can make the wontons ahead or make extras and freeze them on a tray. Put them into bags after they’re frozen. You don’t need to defrost them when boiling. Just boil them a little longer since they are frozen.

https://www.memorabledishes.com/wonton-soup/

Show Buttons
Hide Buttons