Category Archives: Snack

Recipes of Snacks

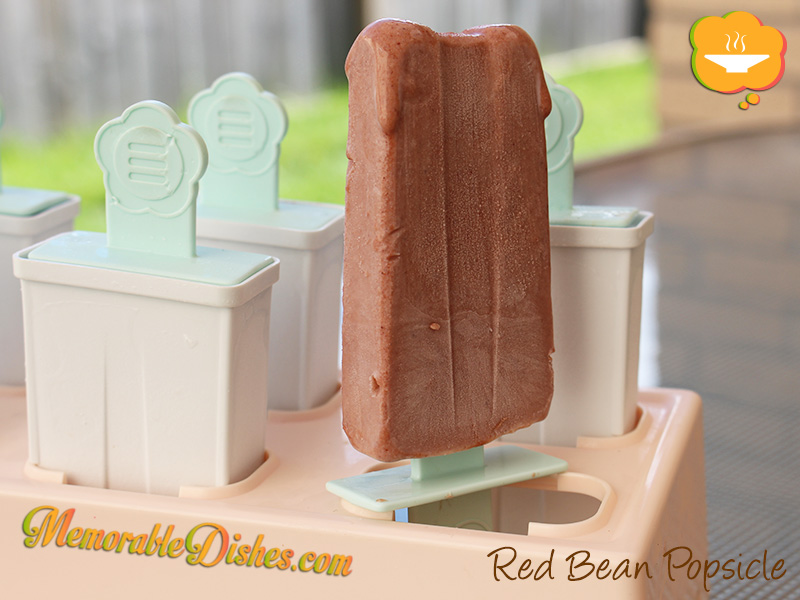
Red Bean Popsicle

Red Bean Popsicles

This Memorable Dish is a derivative of a popular Chinese dessert, red bean soup. It is made from boiling red beans or adzuki beans into a soup sweetened with sugar. Actually, I’m not too crazy about this ubiquitous dessert that can be found at every Cantonese restaurant. Maybe it’s because we tend to get it as a complimentary dessert when we order a set meal. That’s why I’m a little bored by it. However, I love red bean popsicles!

Red bean popsicles trigger fond memories of hot summer days in Hong Kong when my mom made them for us as kids. Believe it or not, I still have her original popsicle molds—these plastic molds have lasted for over 30 years! I find that the plastic popsicle molds nowadays are not as durable. I bought new ones a couple of years ago and they cracked already.

Since red bean soup itself is not a favourite dessert of mine, I don’t have the inclination to boil the red beans for this recipe. 😛 Inventive entrepreneurs have allowed me to recreate this Memorable Dish with their canned sweetened red bean paste. How convenient!

My recipe for red bean popsicle has coconut milk in it. Some Chinese restaurants do serve a contemporary version of red bean soup with coconut milk. I tend to like this version better. This super easy popsicle recipe uses only three ingredients.

Red Bean Popsicles

Red Bean Popsicle

Prep Time: 10 minutes

Total Time: 10 minutes

6 Popsicles

Ingredients

  • 1 cup canned sweetened Red Bean Paste
  • 1/2 cup of Condensed Milk
  • 1 cup of Coconut Milk

Preparation

  1. Blend all the ingredients together in a blender.
  2. Fill the popsicle molds.
  3. Freeze for at least 6 hours or overnight.

Notes

My recipe is based on my own popsicle molds with a little extra leftover. Adjust the amount of ingredients accordingly for your own molds.

https://www.memorabledishes.com/red-bean-popsicle/

Almond Blueberry Flaxseed Muffins

Almond Blueberry Flaxseed Muffins

This Memorable Dish has become my go-to muffin recipe. It’s healthy, not too sweet, and light and fluffy. I don’t remember where it originated from. Surprisingly, I didn’t find this recipe online. I think I initially found this recipe from a newspaper—how retro! I’ve modified the original recipe to suit my family’s liking as usual because we don’t like things too sweet.

This Memorable Dish has been a notorious success with my family. I’d make it when my cousins from the States visited. But I preferred to make them ahead of time so that my cousins would have something to eat for breakfast the next morning. One of my cousins enjoyed them so much she asked for the recipe so that she could make it at home. When we had our Canadian and US families gathered for brunch, she made them here in Canada for us! She really likes these muffins 🙂

This Memorable Muffin is made from almond flour (ground almonds) so the kids cannot bring them to school due to a nut-free policy. However, we make them for home and the kids have them for breakfast or as a snack. Now, my third little one will get to taste this yummy muffin for the first time!

Almond Blueberry Flaxseed Muffins

Almond Blueberry Flaxseed Muffins

Prep Time: 15 minutes

Cook Time: 20 minutes

Total Time: 35 minutes

12 Muffins

Ingredients

  • 1 3/4 cup All-purpose Flour
  • 1/2 cup Almond Flour (ground almonds)
  • 4 tsp Baking Powder
  • 1/2 tsp Salt
  • 1/4 cup Ground Flaxseed
  • 1 1/2 cup fresh Blueberries
  • 2 large Eggs
  • 1 cup 2% Milk
  • 2/3 cup Sugar
  • 1/3 cup Almond oil
  • 1 tsp Vanilla Extract

Preparation

  1. Position rack in middle of oven. Preheat oven to 400°F.
  2. Line 12-cup muffin pan with paper liners.
  3. In large bowl, whisk flours, baking powder, salt, and flaxseed to combine. Add berries and stir to coat.
  4. In another bowl, whisk eggs, milk, sugar, oil, and vanilla extract to combine.
  5. Pour egg mixture into berry mixture and gently mix with a fork to moisten dry ingredients. Don't overmix (a few lumps in batter are normal). Pour batter into muffin cups.
  6. Bake until muffins are puffed and wooden pick inserted into center comes out clean, about 20 minutes. Cool 5 minutes on rack before serving.

Notes

Note #1: If you don’t have almond oil on hand, you can also use a neutral tasting oil such as canola oil.

Note #2: I have also used frozen blueberries and the results are the same except the whole muffin turns blue 🙂

https://www.memorabledishes.com/almond-blueberry-flaxseed-muffins/

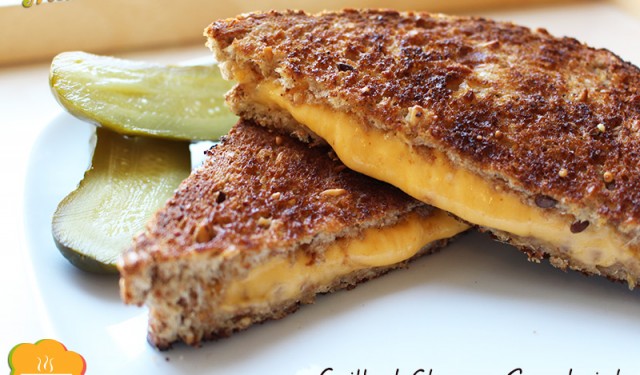
Grilled Cheese Sandwich

Grilled Cheese Sandwich

I’d never had grilled cheese growing up. It wasn’t until my grade 7 or 8 school cooking class when I discovered this Memorable Dish. I loved that cooking class at school! I don’t think we made anything fancy. The only thing I remembered was making grilled cheese. We spread the outside of the bread with butter and the inside with ketchup. Then we peeled the plastic wrap off the processed cheese, (I’m sure if we made this today, the teacher would’ve used real cheese :P) and pan-fried it slowly on the stove. The teacher served the grilled cheese sandwich with a side order of pickles. I thought to myself, “Wow! This is so amazing!” I think I went home and started making grilled cheese after that.

Another discovery I made fairly recently was that a friend of mine makes grilled cheese by broiling it in the oven. Brilliant! Why didn’t I think of that? She also introduced me to a sautéed mushroom version – yum! The kids demand to have grilled cheese at my in-laws every time they stay over. (Maybe I don’t make it enough at home? 🙂

Here’s an easy version you can make by broiling it in your oven. I find it a great way to make lots of sandwiches fast. Just make sure you keep an eye on the oven so you don’t burn them! If you do, just scrape off the burnt parts with a knife and they’re good as new 😉

Grilled Cheese Sandwich

Grilled Cheese Sandwich

Prep Time: 10 minutes

Cook Time: 10 minutes

Total Time: 20 minutes

4 Sandwiches

Ingredients

  • 8 slices of Bread (I use whole wheat)
  • 2 cups grated Cheddar Cheese
  • Softened Butter

Preparation

  1. Grate cheddar cheese.
  2. Butter one side of the bread.
  3. Place 4 pieces of bread, buttered side down on a baking pan/cookie sheet.
  4. Put 1/2 cup of grated cheese on each piece of bread.
  5. Then place the remaining bread on top of the cheese, buttered side up.
  6. Broil on one side until brown (approximately 3-4 minutes).
  7. Move or rotate your pan to brown evenly.
  8. Flip the bread and broil the other side until brown.
https://www.memorabledishes.com/grilled-cheese-sandwich/

Imitation Shark Fin Soup (碗仔翅)

Imitation Shark Fin Soup

Even before it was politically incorrect to eat shark fin soup, I’ve always liked the fake version better. Maybe it was the extra MSG or maybe I was super hungry. But this is one of my favourite Memorable Dishes eaten on the streets of Hong Kong as a child. My older brother and I ate this on the streets after swimming. The street vendor had his (probably unlicensed) cart outside of the public swimming pool waiting for hungry post-swimming patrons. He definitely knew who his target audience was! I, like everyone else gets super famished after swimming, that’s why the street imitation shark fin soup was especially tasty and delicious.

When I found this hawker (street vendor) Memorable Dish at T&T (Chinese grocery store chain in Canada), I couldn’t believe it! I hadn’t eaten this soup in so long and when I discovered it, I was super ecstatic. It was still piping hot from its container when I brought it home. I devoured it and thought of my famished self after swimming in Hong Kong when I was little.

When researching for this recipe, I found a couple of versions. One where they use crab meat and store-bought imitation shark fin and another where shredded chicken, pork, and cellophane noodles are used. I adapted my recipe from both of these versions.

Eating this Memorable Dish brought back vivid memories of when my dad took my older brother and I swimming. Every time we went swimming, I looked forward to eating this hot soup filled with yummy goodness. After rediscovering this dish at the supermarket, I knew it wasn’t just about childhood memories. I genuinely enjoyed this dish! The texture of the crunchy black fungus and the meaty goodness soup warms up my mouth and enters into my soul.

Imitation Shark Fin Soup

Imitation Shark Fin Soup (碗仔翅)

Prep Time: 30 minutes

Cook Time: 30 minutes

Total Time: 1 hour

Serving Size: 4-6

Ingredients

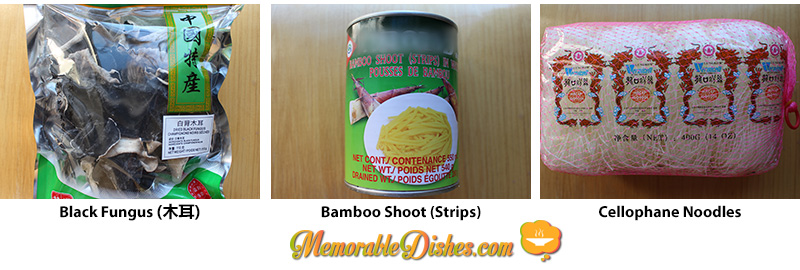
  • 1 cup Imitation Shark Fin or Cellophane Noodles
  • 1 1/2 cup poached Chicken Breast, shredded
  • 1 1/2 cup poached Lean Pork, shredded
  • 1 cup reconstituted Dried Black Fungus (木耳) thinly sliced (see Note #1)
  • 1 cup canned Bamboo Shoots (strips)
  • 1 Egg
  • 6 cups Chicken Broth
  • Cornstarch Solution (combine 2 tbsp cornstarch with 4 tbsp water)
  • ¼ cup Soy Sauce
  • Salt to taste
  • Dash of White Pepper
  • Dash of Black Vinegar
  • Coriander or sliced green onions for garnish (optional)

Preparation

  1. If you are able to find imitation shark fins, blanch them by pouring boiling water over it and leaving it covered for about 5 minutes. Discard water, drain the fins and set aside.
  2. Bring chicken broth to boil in a pot. Add sliced black fungus and bamboo shoots, and simmer for about 5 minutes.
  3. Add chicken, pork and blanched shark fins (if using). Bring to a simmer for another 3 minutes.
  4. If using cellophane noodles only, put them at the very end because it cooks super quick.
  5. Before using cornstarch solution, stir again to dissolve mixture. Slowly pour in the cornstarch solution while stirring until you reach the consistency desired. Add soy sauce and season with salt to taste.
  6. Lastly, slowly pour beaten egg to the soup mixture. Turn off heat.
  7. Dish the soup into serving bowls. Garnish with coriander or sliced green onions (if using). Put dash of white pepper and black vinegar to taste.

Notes

Note #1: Use approximately 4 medium size black fungus. It really depends on how big your black fungus is. Soak the black fungus in hot water to soften. Cut around and discard the hard part. Then slice the fungus into thin strips. If you are unable to find black fungus or don’t want to use them, you can use shiitake mushrooms instead. The texture will be different since black fungus is crunchy and the shiitake mushrooms are soft.

Note #2: Poach the chicken and pork in water and you can use the poaching liquid as part of your broth.

Note #3: For thicker soup, add more cornstarch solution. For a thinner soup, don’t add as much solution.

https://www.memorabledishes.com/imitation-shark-fin-soup/

Imitation Shark Fin Soup - 3 pix

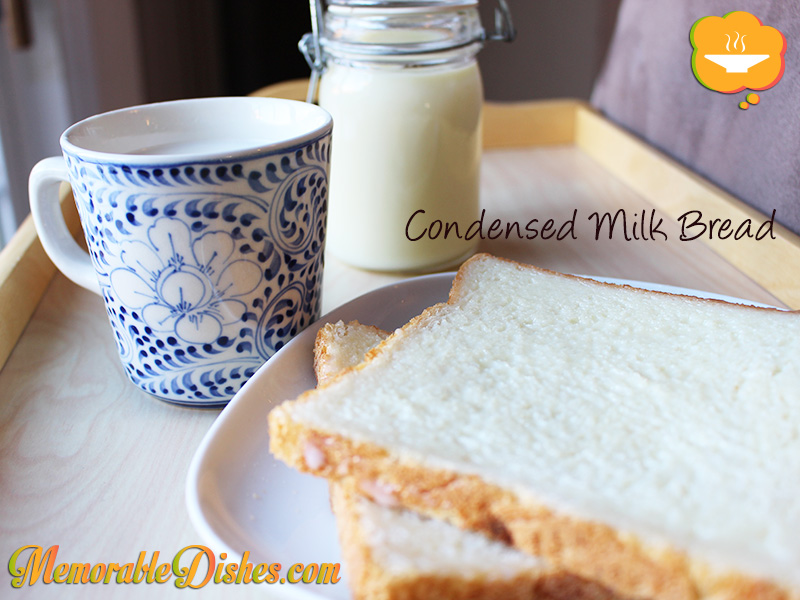
Condensed Milk Bread

Condensed Milk Bread

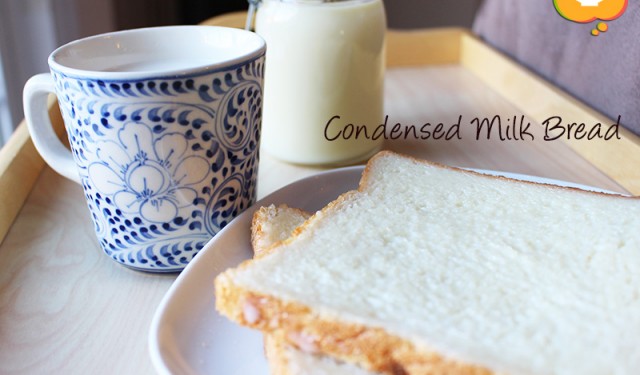
I don’t know if it’s a Hong Kong British thing but when I was growing up my grandmother used to spread condensed milk on top of white bread for us to eat. We would have it for breakfast or as a snack. Nowadays, it would be considered an unhealthy snack let alone a breakfast for kids! Sweetened condensed milk full of sugar on top of white bread – the horror! I’m surprised my older brother and I weren’t bouncing off the walls nor obese despite this fairly frequent indulgence.

I did a quick search online for condensed milk bread and saw that others have created the same treat! Here, the author called it condensed milk toast and got the recipe from Rachel Ray magazine. They both used fancy brioche toast. My grandmother just spread the condensed milk on top of plain soft, fluffy, untoasted white bread bought from an Asian-Western style bakery.

Not only was this condensed milk bread the best thing ever, but my grandmother also created another treat out of the condensed milk. There was no way we could finish a whole can of condensed milk spread on bread in one sitting (or could we? 😉 ) She would pour the leftover can of condensed milk into a glass jar and store it in the fridge. It was impossible to scrape off all the residual thick condensed milk still stuck inside of the can. So my resourceful grandmother put boiling water inside the can and swished it around. And voilà! Condensed milk as a drink! I think I loved this sweetened milk drink more than the bread itself.

This is one of those Memorable Dishes that is so simple yet brings back the fondest of memories. I don’t buy condensed milk very often. But every time I see a can of it at the grocery store I think of my grandmother’s condensed milk bread and drink.

Condensed Milk Bread

Condensed Milk Bread

Prep Time: 5 minutes

Total Time: 5 minutes

4

Serving Size: 4

Ingredients

  • 4 slices of White Bread (If possible, get it from an Asian-Western style bakery.)
  • 1 can of Condensed Milk

Preparation

  1. Spread the condensed milk on bread and enjoy!
  2. For Condensed Milk Drink Preparation
  3. Pour leftover condensed milk in a glass jar and refrigerate.
  4. Pour boiled hot/warm water in the condensed milk can, filling half of the can only.
  5. Scrape the sides of the can and stir with a spoon.
  6. Pour diluted milk into a cup and fill the cup with more water.
  7. Add more condensed milk into cup to taste.
  8. Stir and enjoy!
https://www.memorabledishes.com/condensed-milk-bread/

Tomatoes Stuffed With Ham Salad

Tomatoes Stuffed With Ham Salad

Even though I spent the first eight years of my life in Hong Kong, my childhood Memorable Dishes could easily have come from a child in North America. The British influences in Hong Kong have added a plethora of interesting dishes to the Hong Kong people. Because of my mom’s adventurous nature in the culinary world, my childhood dishes were made up of both Chinese and Western dishes.

One of my most fondest memories was our weekend potluck parties with friends and family. These weekend gatherings consisted of lots of yummy food coupled with mahjong games for the adults. The kids were left to their own devices while the adults played mahjong. I don’t know why we had so much fun playing even though Hong Kong apartments were fairly small.

When we got hungry from playing, we would grab these stuffed tomatoes and pop them into our mouths. Well, maybe not pop them but took a couple of big bites. At that time, neither cherry nor cocktail tomatoes were available in Hong Kong so my mom used the smallest tomatoes she could find to make these delicious snacks.

I just found out from my mom that she used butter in this recipe. No wonder why they tasted so good! I am recreating this dish using small vine-ripened cocktail tomatoes. Feel free to use cherry tomatoes if you want them to be more bite-sized.

Tomatoes Stuffed With Ham Salad

Tomatoes Stuffed With Ham Salad

Prep Time: 30 minutes

Total Time: 30 minutes

Ingredients

  • 12 Cocktail Tomatoes (ripe but firm)
  • 1 cup diced Ham
  • 3 tbsp Mayonnaise
  • 1 tsp of melted Butter (Use if you want to keep it the old school way. Omit if you are more health conscious 🙂
  • A few dashes of White Pepper
  • Parsley for garnish (optional)

Preparation

  1. Cut the top of the tomatoes big enough to scoop out the seeds. Scoop and discard the seeds.
  2. Cut a bit off the bottom of the tomatoes so that the tomatoes can stand up.
  3. Turn the hollowed out tomatoes open-side down so you can drain the extra juice out.
  4. Mix ham, mayonnaise, butter (if using).
  5. Fill tomatoes with ham mixture.
  6. Garnish with parsley if using.

Notes

Note #1: If you can’t find cocktail tomatoes and end up using bigger tomatoes, you can cut bigger tomatoes in half instead.

Note #2: You can prep this a few hours ahead and leave it in the fridge. When you are ready to serve, scoop the ham mixture into the tomatoes.

https://www.memorabledishes.com/tomatoes-stuffed-with-ham-salad/

Show Buttons
Hide Buttons